Showing posts with label orange. Show all posts

Friday, 12 September 2014

Kugelhopf

So continuing along with the bake off you may have noticed I do not have a post for tarts and pies week. Well I did attempt to make a pie, I was terrified, a gluten and dairy free pastry was not an experiment I was looking forward to. The pastry I made was lovely and delicious, but it was meant to be puff pastry, something I never had problems with in the past,  and it turned out like shortcrust. I will reiterate it was lovely but I am not posting the recipe I used as it did not turn out as it should. I get to do pastry again soon though as next week is pastry week on the bake off! I show a picture of my pie to prove that I tried.


This week was the week of European cakes. The contestants had to make a European cake that was raised with yeast, a Swedish princess cake or a Hungarian dobes torte. I have never made a princess cake but I have eaten cakes consisting of sponge, jam, cream and creme pat and so I decided to go with the more interesting cake raised with yeast as I have never made/eaten one before.

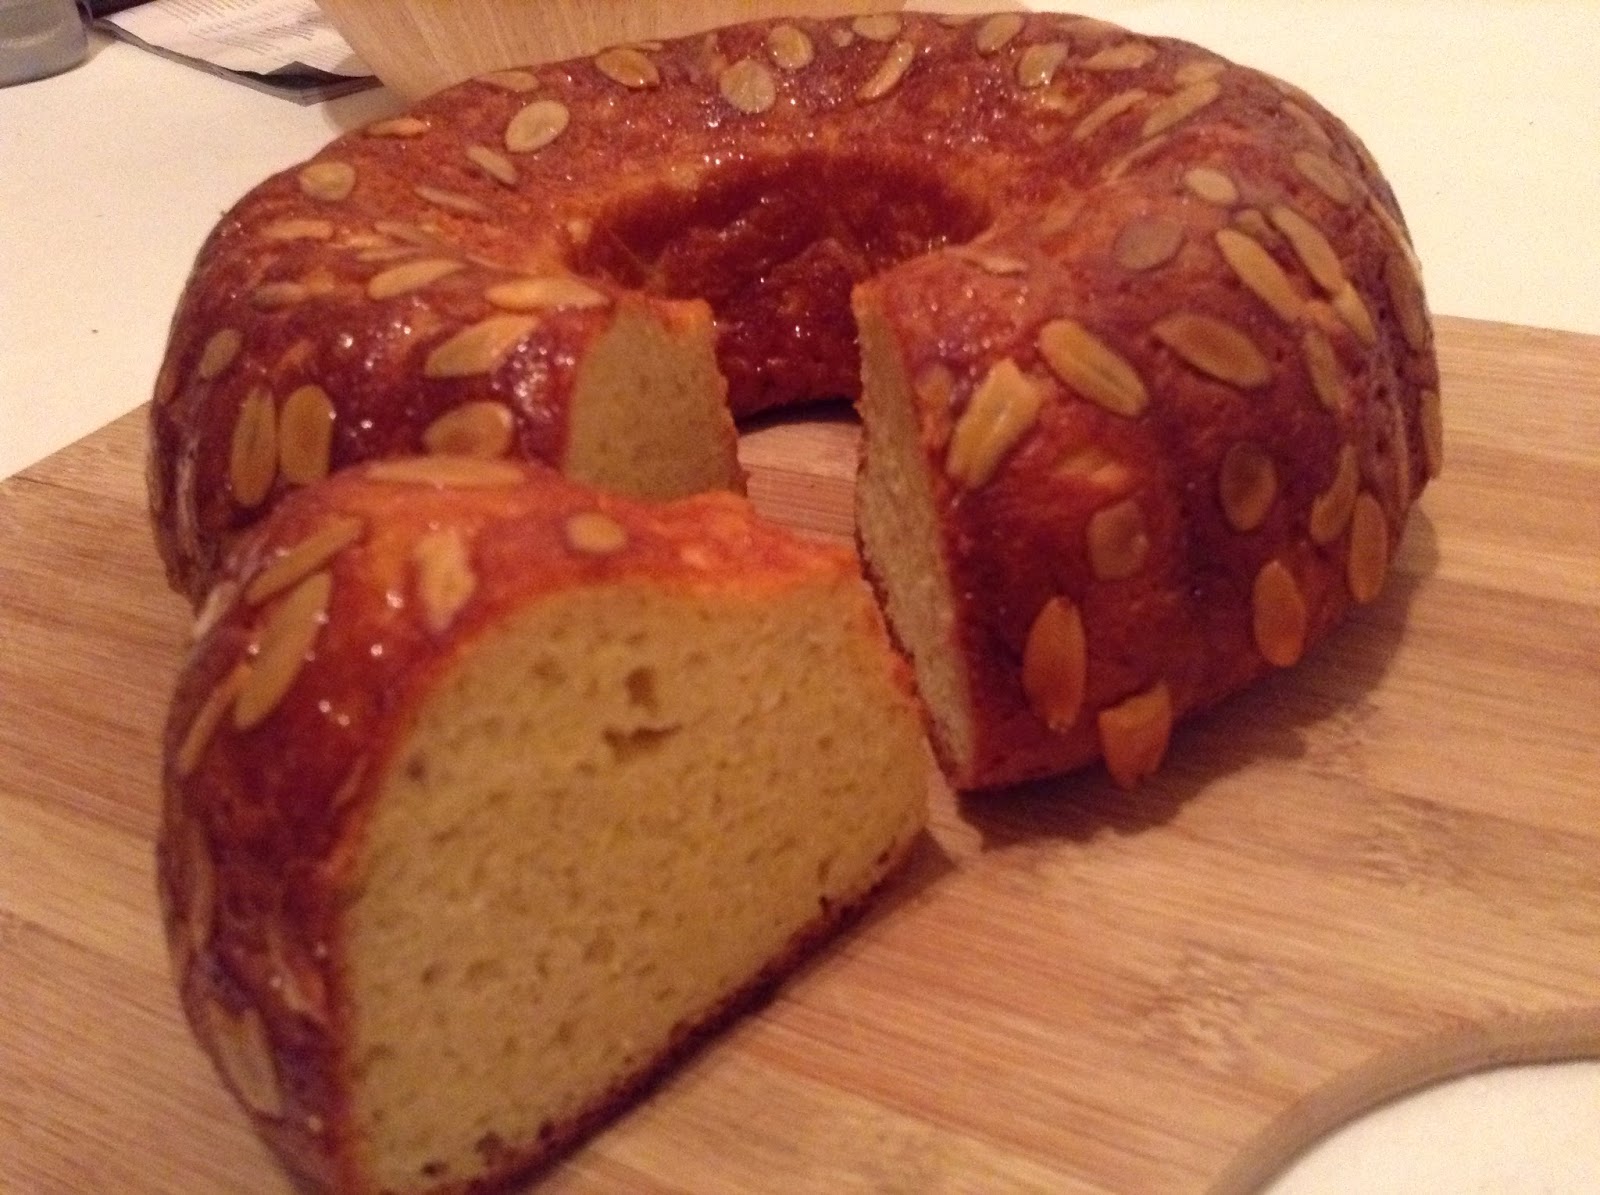
I decided, like some of the contestants, to make a Kugelhopf. This is traditionally a cake raised with yeast, filled with fruit and cooked in a bundt tin. Like many of the contestants I changed my flavours, I went for cardamom, orange and almond. I also had the added challenge of making it gluten and dairy free.

I have also just remembered that this months letter for alpha bakes is K and so I will enter my Kugelhopf!


This is an experiment that worked and I am so so pleased with it, it smelt good baking, looked fantastic and also tasted great. It is very interesting, it is definitely a cross between bread and cake and those with palettes used to very sweet cakes will probably take a while to adjust. It is lovely as a plainer cake and dare I say it could even be eaten as breakfast (which I did). It does not keep so long so I have sliced it and individually wrapped slices and frozen them, I will refresh in the oven when I fancy a snack or breakfast.

Orange, cardamom and almond Kugelhopf 

380g GF flour (I used dove farm plain flour blend)
60g ground almonds
2 tsps xantham gum
Seeds of 15 cardamom pods, crushed in a pestle and mortar
120ml warm water
4 1/2 tsp active dried yeast (not instant yeast)
1/2 tsp sugar
120g DF spread (I used pure sunflower)
75g golden caster sugar
2 tsp salt
3 eggs
2 tsp almond extract
Zest and juice of an orange
2 tbsp caster sugar
a little melted butter to grease
slivered almonds to decorate (optional


Place the warm water, yeast, and ¼ teaspoon sugar together in a small bowl. Stir until yeast is dissolved. Set aside for 10-15 minutes until the yeast is foamy

Place 220g of the gluten-free flour in a freestanding large bowl or the large bowl of a large stand mixer. Add the xanthan gum and cardamom and mix to combine

In a small saucepan, heat the milk, butter, sugar, and salt. Stir until sugar is dissolved, do not let it boil.

In a medium bowl whisk  the eggs together with the almond extract and orange zest. Carefully add the milk mixture in a slow, steady stream to the eggs and whisk well. Be sure to add the milk slowly so it doesn't curdle the eggs. 

Turn the mixer on low, or using a hand held electric whisk add the milk and egg mixture in a slow steady stream to the flour mix. Raise the speed to medium and mix until smooth. Lower the speed and add the remaining flour and ground almonds. The dough should be fairly sticky and smooth, but not too stiff. Turn off mixer and let dough stand for a few minutes.

Grease a bundt pan with melted butter. if desired stick slivered almonds onto the sides of the greased pan.

 Carefully transfer the dough to the pan and smooth it evenly. Brush the top with the melted butter to prevent it drying out. 

Cover with cellophane or place in a bag and let rise for 45-60 minutes in a warm place. The dough won't have doubled, but it will have risen quite a bit.

While the dough is rising preheat the oven to GAS MARK 6 . Bake for 40-45 minutes, or until golden and baked through.

Let cool in the pan for a few minutes, then transfer to a wire rack to finish cooling.

To make a glaze put the remaining sugar and orange juice in a pan and heat gently until the sugar had dissolved, turn up the heat and reduce until the mixture is syrupy. Brush this over the cooled cake then enjoy.


Wednesday, 30 July 2014

Chocolate orange cake (Dairy and gluten free)

I have braved making a cake in my new oven (well not NEW new, I just moved flat)! A different oven is a mystery of a thing, is it a 'hot' oven, a 'cold' oven, is there hot spots? As well as this I had to get used to a gas main oven as opposed to electric.

I have worked out that it is cool oven, I actually prefer this to my old 'hot' oven that used to really brown the edges of my cakes!It has a little hot spot but not as bad as my last oven, so now my cakes rise ever so slightly unevenly as opposed to completely uneven So all in all a bonus.

This cake tastes like a terry's chocolate orange in cake form, really it does. The frosting is amazing I could literally eat it straight from the bowl forgoing the cake BUT if I did that I would miss out on cake so I managed to restrain myself.

I have made this cake completely dairy and gluten free, obviously if you do not have these requirements you could use butter and regular flour and leave out the xantham gum.


Chocolate orange cake

3 eggs, weighed with shells, room temperature
Same weight of dairy free spread (I use Pure)
Same weight of sugar
Tsp vanilla paste
zest and juice of one orangeSame weight of gluten free plain flour minus 30g
30g cocoa powder2 Tsp gluten free baking powder baking powder
1/2 tsp xantham gum
100g dairy free spread
zest of one orange
30g cocoa powder
200g icing sugar
1 tbsp Boiling water


Grease and line the base of two  20cm cake tins, if like me you do not have two make the cakes in batches. Preheat the oven to 160C/140C FAN or Gas mark 3.


Beat the butter and sugar together until light and fluffy then beat in the vanilla, orange zest and eggs for a further minute. Add the flour, cocoa powder, baking powder and xantham gum and beat until just combined. Do not overbeat


Divide the mixture equally between the tins and bake for. 25-30 mutes until springy.
Leave to cool in the tins for 15 minutes then transfer to a wire rack to cool completely.

Once the cakes are cool sandwich them together with the frosting, method below.

To make the frosting melt the butter in pan over a gentle heat then add in the orange zest, add the cocoa powder and cook for 1 minute whilst stirring. remove from the heat and beat in the icing sugar, it will look terrible, like it has split, never fear, add in a tablespoon of boiling water and beat well,  the frosting should now be thick  and smooth, with no sign of splitting, add a tiny touch more water if you feel it necessary


Tuesday, 31 December 2013

Chocolate orange brownies

Happy New Year! Now before you all embark on detoxes and healthy eating here is a truly delicious, indulgent recipe. I suspect many people will have got Terry's chocolate oranges for Christmas and may have them left over if they have had other goodies to eat, if not many supermarkets are now selling them off.

I myself was requested to make brownies for a boxing day party. I decided to make them 'christmas-y' by adding the chocolate orange and was very happy indeed to find them by one get one free. One for the brownies one for me! I used a white chocolate orange for a nice contrast but use any variety you like.

A low oven really does make for the best fudgey brownies. My parents oven is not like my crazy super hot oven and resulted in the best brownies I have made for a long time. I will be turning my oven down even further when I go back home.

Chocolate orange brownies

200g dark chocolate
175g butter
1/2 teaspoon vanilla extract
tablespoon strong coffee
300g caster sugar
115g plain flour
15g cocoa powder
3 eggs
1 chocolate orange, each segment broken into 3

Preheat the oven to 170oC/fan 150oC and line you brownie pan with baking parchment.

Melt the chocolate and butter until smooth (I did this in a bowl over a pan of barely simmering water).

Once melted, remove the butter chocolate mix from the heat and stir in the sugar, vanilla and coffee until fully incorporated.

Add the flour and cocoa powder to the bowl and mix until combined.

Beat the eggs lightly with a fork and add to the bowl, mix until smooth and then finally stir through the chocolate orange.

Pour the mixture into the prepared pan and cook for 30-35 minutes until lightly flaky ontop but not overcooked.

Leave to cool in the pan then cut into chunks

Saturday, 16 November 2013

Whole orange cake

This cake came about because I asked for one orange for a salad dressing. I got two because according to Mark they looked so pretty. So a spare orange was staring at me from the fruit bow. I remembered reading this recipe in a recipe book a colleague had and so decided to utilise the orange to make a cake. You essential boil the orange for an hour then purée it and add it to a simple cake batter.

The results are a lovely moist orange favoured cake. The recipe suggests drizzling with an icing made from orange juice and icing sugar but I did not do this. The cake is orangey enough without it, and besides, I would have needed another orange, and that's how I got into this in the first place!


Whole orange cake

1 small orange
140g caster sugar
3 eggs
85g self raising flour
100g ground almonds
50g butter melted

Put the orange in a pan, cover with cold water and bring to the boil. Cover, reduce the heat and simmer for 1 hour. Remove the orange and allow to cool. To cool quickly run under cold water for a few minutes.

Preheat the oven to 180C/160C FAN. Grease a deep 20cm round springform tin and line the base. 

Roughly chop the cooled orange, discarding any pips, and whizz in a food processor until smooth. 

Beat the sugar and eggs until light and fluffy. Gently fold in the flour and the almonds then fold in the orange purée. and melted butter until just mixed. Pour into the prepared cake tin and bake for 45 minutes until the cake is golden and springy. Cool in the tin for 5 minutes before transferring to a wire rack.


This is a simple cake perfect at any time, especially when you want cake but nothing too sweet or rich. It stays moist thanks to the almonds and is nice cold or warmed through in the oven.

I am going to enter this cake into this months alpha bakes, the letter for this month is 'O', so orange fits the bill perfectly.


Monday, 2 September 2013

White chocolate, orange and cardamom breakfast rolls

So having said I would only bake one thing from each bake off week I have already made two from bread week. I was impressed with Ruby for making a peacock out of bread, something I would never have thought of, let alone have attempted! The judges were impressed with her flavour though too and not just its looks, and I have to say I was tempted to try it myself.

So these morning rolls were conceived, as I may have mentioned I was not going to make  peacock!

The recipe can be found here, along with the instructions for making the peacock, should you wish to try.

I divided the recipe by 3 and got 6 rolls.

To the basic mix I added the zest of a whole orange, and the crushed seeds of three cardamom pods. Once I had kneaded the dough I then added 1/2 of my chopped white chocolate and briefly kneaded it in.

After the first proving I rolled the dough into a rectangle, sprinkle over the crushed seeds of 3 more cardamom pods, a tablespoon of caster sugar and the remaining white chocolate. I then rolled up the dough, cut into 6 equal buns and then set on a baking tray covered with parchment to rise for a further 30 minutes.

At this point I covered the dough and left in the fridge overnight.

To bake the rolls I heated the oven to 140C (fan) and cooked for 20-25 minutes.

They were delicious. Thank you for the idea Ruby!

Tuesday, 23 July 2013

Strawberry, poppyseed and orange cake

This is one of the more delicious cakes I have had recently. The cake itself has a lovely crumb and texture and the flavours are a little different but amazing.

The orange creme fraiche and Greek yoghurt filling is fresh, zingy and a nice summery alternative to cream. The poppy-seeds work really well too, adding a subtle flavour and nice texture contrast.
This is a good food magazine recipe, it can be found here.

I made a couple of tweaks. There are two of us, I sense it is not the best for our health to attempt to eat a four layer cake, so I halved the recipe to make a two layer cake. The recipe also called for full fat greek yoghurt and creme fraiche. I had 0% fat greek yoghurt and 1/2 fat creme fraiche in the fridge. Waste not want not,  I used these and the filling turned out luscious and fine.
If you are a cake fan I urge you to make this beauty while British strawberries are in season.

Thursday, 21 March 2013

Orange marmalade cake

I don't like marmalade by itself, it has a bitterness that I am not a fan of. Nor am I a fan of wishy washy cakes. Adding marmalade to an orange cake results in a couple of fantastic things. The marmalade adds a fantastic depth of orangey flavour without any trace of bitterness.

I was a smidgen worried when I put this cake in the oven, as after the addition of marmalade my cake batter appeared to curdle. I need not have worried though. The texture of this cake is a delight, open and very soft. I have already mentioned that the flavour is fantastically deep too.

The icing in the top is not 100% necessary if you do not wish, but it does add another orangey hit.

Orange marmalade cake (from Nigel Slater)

makes 1 loaf

175g butter
175g golden caster sugar
1 orange
3 eggs
75g orange marmalade (fine shred or shred-less)
175g self raising flour
75g icing sugar

Preheat the oven to 180C/160C FAN and grease a 950g loaf tin.  Line the greased tin along its length and short sides with a strip of greaseproof paper, this will make removing the cake easy.

Beat the butter and sugar until light and fluffy then add the zest of the orange. Add the eggs one at a time, beating well to combine, scrape down the sides of the bowl after each addition. Beat in the marmalade until well incorporated.

Add the flour to the bowl and fold in gently with a metal spoon. Finally fold in the juice of half the orange.

Tip the cake mix into your prepared tin and level the top. Bake in the preheated oven for ~40 minutes.

Leave the cake to cool in the tin for 10-15 minutes before transferring to a wire rack to cool completely.

For the icing simply mix the icing sugar with some of the remaining orange juice. Add just a little juice at a time until it is a thick drizzling consistency. Drizzle on the cake and you are done!

Thursday, 21 February 2013

Cardamom and orange blossom loaf cake

I absolutely love cardamom in bakes, it has a hint of spice and adds a unique flavour and fragrance. This cake keeps well and is robust enough to wrap up and take to work as a fantastic mid afternoon 'pick me up' with a cup of tea. The orange blossom is a last minute addition and it just adds to the fragrant nature.


Cardamom and orange blossom loaf cake


190g butter
Seeds from 10 cardamom pods, crushed with pestle and mortar
175g caster sugar
3 eggs
190g plain flour
1tsp baking powder
25ml crème fraiche or natural yoghurt
1 tsp orange blossom water

Preheat the oven to 170C/150C FAN and grease and flour a 900g loaf tin.

Beat the butter, crushed cardamom seeds and caster sugar together until light and fluffy. Beat the eggs in, one at a time, scraping down the sides of the bowl after each addition.

Add half the flour and baking powder and beat on slow until just combined. Add the second half and once again mix until combined. Finally add the crème fraiche and orange blossom water and mix for a final time.

Pour the mix into the prepared tin and level the top. Bake in the preheated oven for 50-55 minutes until golden and a skewer inserted into the centre comes out clean.

Allow to cool in the tin for 10-15 minutes then turn out onto a wire rack and allow to cool completely.

Thursday, 17 January 2013

Daisy cupcakes

As you may well imagine I received a plethora of baking/ cooking related gifts for Christmas (including a blowtorch!), among them were cute little wafer daisies.

I imagine these daisies could be used in a while number of ways to pretty up your bakes, I myself used them to decorate little orange and lemon cupcakes, these cupcakes are lovely to eat but to look at, perhaps not the most exciting. These little daises are perfect for making them look as fresh and 'springlike' as they taste (Yes I know its January and -2, but I am allowed to dream of spring)

I am going to be a little sneaky and enter these into this months alpha bakes, the letter this month is 'D' and D is for daisy!

Orange and lemon daisy cupcakes

makes between 10 and 12 depending on cupcake liner size

80g butter
50g natural yoghurt or low fat natural yoghurt (not fat free)
125g caster sugar
zest and juice of a lemon
zest and juice of an orange
1 large egg
130g self raising flour
1 tablespoon of milk

125g butter
250g icing sugar
1/2 tablespoon of milk

Preheat the oven to 180C/160C FAN and line a cupcake tin with cupcake cases.

Beat the butter, sugar and zest of the orange and lemon until light and fluffy. Beat in the yoghurt until combined. Add the egg and beat for a further minute. Beat in the flour on slow until just incorporated. Add the milk, 1/2 tablespoon of the orange  juice and 1/2 tablespoon of the lemon juice and beat for a final minute. Divide the mix equally between the cupcake liners, filling them 2/3 full. Bake for ~20 minutes until golden and spring, transfer to a wire rack to cool fully.

For the frosting beat the butter and icing sugar until combined. add the milk and beat until very light and fluffy. Add 1/2 tablespoon of each of the lemon juice and orange juice and beat for a further minute.

Frost the cupcakes and top with a wafer daisy. Et Voilà. 


Thursday, 27 December 2012

Orange tuile biscuits

Hello, hope everybody had a fantastic Christmas! Do you still have lots of festivities planned? Maybe a dinner party or elegant NYE dinner? If so these little tuile biscuits will go down a treat with an elegant dessert not to mention impress your guests.

Orange tuile biscuits

makes ~28

2 egg whites
125g caster sugar
75g butter
zest of 2 oranges
75g plain flour

Preheat the oven to 180C/160C FAN. Gently warm the butter until it has melted. Grate in the orange zest and set aside to cool.

Whisk the egg whites with half the sugar until soft peaks form. Continue whisking and gradually add the remaining sugar, whisk until firm peaks form. Whisk in the cooled melted butter. Gently fold in the flour.

Place a heaped teaspoon of the mix onto a non stick or well greased baking sheet and, using the back of a spoon, spread into a circle about 10cm in diameter. The circle will be very thin. I would do no more than four per sheet and make sure that they are spaced well apart.

Bake in the oven for 6 to 8 minutes until they a golden brown around the edges, watch the like a hawk, they will burn very quickly

When done remove from the oven. Working quickly remove them from the baking sheet, using a palette knife, and mould around a rolling pin. Repeat for all the biscuits.

If the last ones firm up before they are removed pop the sheet back in the oven for 30 seconds to soften them.

When they are firm, it will only take a minute, remove from the rolling pin and place on a wire rack to cool. Best eaten the day they are made, for maximum crunch, but they can be stored in an airtight container.

.

Saturday, 6 October 2012

Chocolate orange marble cake

Hi, just a quick post today its been a busy busy week. Still have a few posts waiting to be finished and up loaded!

I wanted a nice simple cake to enjoy with a cuppa after work and this fits the bill perfectly.

For the recipe just follow my vanilla and chocolate marble cake recipe, here. Once you have divided the batter simply add the zest of a grated orange and juice from half the orange to the vanilla batter.

I do not think this cake needs any icing it is fantastically moist and just the thing for when you want a delicious but simple cake.

Friday, 17 August 2012

Spelt, orange and maple biscuits

These are one tough cookie! Not to eat, I would not give you a tough biscuit recipe to make, but I personally found them tricky to make, especially as I was expecting them to be simple and quick to do.

The recipe states that once the dough is brought together to chill it for 30 minutes and then roll it out. Mine did not roll. It crumbled. Only the heat of my hands would bring it together enough to stamp out. Although I measured everything I suspect maybe my dough was a little dry and maybe a splash more orange juice and oil would have solved the problem.

Once they were baked however these biscuits held together perfectly well. They are good biscuits for those who do not have a sweet tooth, or for those of us that do but fancy a change, they do not contain much sugar and the main flavour comes from the orange and the nuttiness of the spelt four.


Spelt, orange and maple biscuits (slightly adapted from Biscuit by Miranda Gore Browne)

250g wholemeal spelt flour
50g oats
60ml olive oil
50g caster sugar
2 tablespoons maple syrup
zest and juice of 1 orange

Mix the flour and oats together in a bowl. Mix the remaining ingredients together and then add to the bowl, mix until a dough comes together. If it is a little dry maybe try a smidge more oil/juice. Divide the dough into two and shape into a flattish disk. Wrap in clingflim and chill for at least 30 minutes. 

Preheat the oven to 180C/160C FAN and line two baking sheets with baking parchment. Take your dough and roll it to about 3 cm thick and using a cutter of your choice cut out biscuits. I had problems rolling and ended up kind of squishing my dough out. 

Place the cut out biscuits onto the prepared baking sheets and bake in the preheated oven for ~10 minutes until lightly golden. Transfer the biscuits to a wire rack and allow to cool. 

I kept them in an airtight tin and thought that after day 3 they were past there best, M thought no such thing however and polished off the remaining few on day four!

I really like spelt flour at the moment and plan on trying it in a few more bakes soon

Friday, 3 August 2012

Maple, raspberry and orange cupcakes

Hmmm I do like chocolate but it has come to my attention that out of my last 5 posts 4 contain chocolate, and the fifth was a savoury bake! I am sure this is just coincidence with various blogging challenges and celebration bakes resulting in more chocolate than usual!

Still it was my aim to make something a little less rich and a bit more fruity. I had a little think and adapted a love bakery recipe I liked the sound of. The book has a 'breakfast' cupcake that is flavoured with honey and topped with greek yoghurt frosting.

I flavoured my cupcake with maple syrup, filled it with cooked raspberries and while I did use a greek yoghurt frosting I spiked it with orange zest.

Maple, raspberry and orange cupcakes


makes 12


For the cakes


125g butter
125g caster sugar
1 tsp vanilla paste
1 tbsp maple syrup
2 eggs, room temperature
125g self raising flour
1/2 tsp baking powder
3 tbsps milk


For the filling


120g raspberries
20g raspberry jam


For the frosting


50g butter
60g greek yoghurt
350g icing sugar
zest of one orange
handful of oats 


Preheat the oven to 180C/160 FAN and line a cupcake pan with 12 cases.


Using a handheld or free-standing electric whisk, beat the butter, sugar, vanilla paste and maple syrup together until very light and fluffy (up to 5 minutes). Add the eggs and beat for a further two minutes, scrape down the sides of the bowl with a spatula. Add the flour and baking powder to the bowl and beat until fully incorporated, scrape down the bowl again. Add the milk and beat for a further minute.

Fill the cases 2/3 full, I used an ice cream scoop for easy filling. Bake the cupcakes for 20-25 minutes, until golden and springy to the touch. Note the maple syrup does result in them colouring a little more than other cupcakes but all is fine. When done cool the cupcakes on a wire rack.


While the cupcakes are in the oven pop the raspberries and jam in a small saucepan with a teaspoon of water. Cook gently until the raspberries have mainly broken down. Leave to cool. As this mix cools it will thicken. 


When the cupcakes are completely cool cut a cone out of each of them. Fill the cavity with the cooled raspberry mixture and place the cone back on top. The cone will have to be trimmed to fit back in, and YOU, the baker, can nibble these off cuts as a bakers treat!
For the frosting beat together the butter, greek yoghurt and orange zest, continue beating and add in the icing sugar a tablespoon at a time. Do not panic it will get soupy initially, just keep going. 


Now if you want to pipe your frosting you will have to keep it in the fridge for at least an hour, I tried piping mine straight away and my beautiful spirals did not stay. 


Dry toast a handful of oats in a pan, keep an eye on them they can burn quickly, scatter the toasted oats over the frosting and you are done!

Thanks to the raspberry and orange these cupcakes are not overly sweet, and the cake itself has a lovely flavour. Just the cupcake for the sunny days that have finally arrived!

Tuesday, 24 July 2012

White chocolate and orange cookies

Rather unusually I had some white chocolate going spare, I normally cannot keep it my in cupboard long term without nibbling at it!

A quick root around my baking cupboard confirmed that I had all the ingredients handy to make these cookies.

 I do not think that I have made them since I was in america which is a) a crime, as they are delicious and b) why I had forgotten that a few aspects of the recipe need tweaking. 

These cookies spread, a lot, they need to be much more than the stated 5cm apart, and secondly they do not need to be flattened, they spread enough on their own. The first batch of my cookies were still delicious but a little misshapen!

These were not planed but as I have just realised that they have white chocolate in them I am going to squeeze them into this months alpha bake. Alpha bakes is a blogging challenge which is hosted on alternate months by Ros from The more than occasional baker and Caroline from Caroline makes. This is a monthly challenge where the aim is to bake with an ingredient that starts with the random alphabet letter chosen for that month. This months host is Caroline and the letter ‘W’.

White chocolate and orange cookies

makes ~30

113g butter
230g caster sugar
tsp vanilla paste
zest of an orange
1 large egg
165g plain flour
1/2 tsp bicarbonate of soda
1/4 tsp baking powder
150g white chocolate, chopped 

Preheat the oven to 190C/170C FAN and line baking sheets with baking parchment.

Cream together the butter, sugar and vanilla paste. Add the orange zest and the egg and beat until fully incorporated. Add all the remaining ingredients and stir to combine.

Roll into balls, I used a tablespoon as  guide, and space very well apart on the baking sheets. Bake for 8-10 minutes until golden.

Leave to cool on the baking sheets for 5 minutes, using a palette knife, transfer the cookies to a wire rack to finish cooling. 

Once I had ironed out the creases, my cookies looked like cookies! They should keep for 5 days in an airtight tin, but I am not sure they will last that long!