Showing posts with label lemon. Show all posts

Saturday, 14 February 2015

Valentine shortbreads (gluten free, lactose free)

If truth be told my fiancé and I do not like the commercialism of valentines day, I can think of nothing more awkward than being in a restaurant on valentines evening. I would not say I am anti valentines, I believe in showing someone you love them, I just don't think I need a set time and day to do that, and nor do I need people cashing in on our love. Still I know many people love it, each to their own, and if it makes you happy that's fabulous.

I made these biscuits however for two reasons. One I won a bake off at work and one of my prizes was this cute letter stamp set from Lakeland. With valentines a few days away I decided shortbread lovehearts could be quite cute. Secondly the letter for this months alpha bakes is V. So that was sorted, a Valentines bake.


Oh there is a third reason to make these, they are yummy. Vanilla shortbread sandwiched with lemon or chocolate buttercream. As you know if you handle regular shortbread to much it becomes tough, this is the caused by the gluten in the flour, The best thing about using gluten free flour is that the gluten is not there, which means that you can re-roll the scraps of this dough until they are all used up and no tough biscuits occur. Actually they are fantastically short, I think they are better than shortbread I made with wheat flour, hurrah! I have used lactose free butter for that buttery taste, If anyone uses a completely dairy free spread to make shortbread I would love to know how they turn out.

You could make these biscuits in any shape you like, not just hearts, and you do not have to stamp them if you do not have stamps, they will still taste delicious.


Vanilla shortbread 

200g lactose free spread
100g caster sugar
tsp vanilla extract/paste
275g GF plain flour
1/2 tsp xantham gum

For the buttercream

50g lactose free spread
150g icing sugar
splash of diary free milk if needed
Tablespoon of cocoa powder
zest of a lemon


Beat the spread, sugar and vanilla paste together until combined and creamy, then fold in the the flour ans xantham gum. It will initially look like you have way too much flour but be patient all will be fine. Wrap the dough in clingfilm and refrigerate for 30 minutes.

Line the baking sheets with baking parchment. Roll out the dough between two sheets of clingfilm until 5mm thick, stamp out shapes of your choosing and transfer them to the parchment lined baking sheet. Transfer the baking trays to the fridge for 15 minutes. While the cut out biscuits are chilling preheat the oven to 180C/160C FAN/ gas mark 4.

Bake the biscuits for 20 minutes until lightly golden. Leave to cool briefly on the baking sheet before transferring to a wire rack to cool completely.


To make the buttercream beat the sugar and spread together until light and creamy, if it need a little help to come together add the tiniest splash of dairy free milk. I then split the buttercream in half. To one half I added the lemon zest and to the other I added the cocoa powder which I had made into a paste with a tablespoon of boiling water.

Once the biscuits are cool sandwich together with the buttercream. I only sandwich a few together at a time. I keep the unsandwiched biscuits in the tin and the buttercream covered in the fridge. I then sandwich biscuits as and when I need them. This way the biscuits stay beautifully crisp.

Monday, 26 January 2015

Lemon Victoria Sponge

January seems to go on forever doesn't it? Its still cold and dark but without the sparkle of Christmas lights in December and pay day seems ages away, for me personally when I get paid on Wednesday it will have been 40 full days since I was last paid. This sunshine like cake is enough to brighten the dark poor days and reminds us that spring IS on the way.

If you do not need to follow a special diet you can use butter, dairy cream, any lemon curd and wheat flour, simply omit the xantham gum. 


I will enter this cake for alpha bakes as the letter this month is L.


Lemon victoria sponge

3 eggs, weighed with shells, room temperature
Same weight of dairy free spread
Same weight of sugar
Same weight of GF plain flour
1 tsp baking powder
1/2 tsp xatham gum
Tsp vanilla paste
zest lemonLemon curd (I made my own, so it was dairy free)
Dairy free cream
Grease and line the base of two 20cm cake tins, if like me you do not have two tins then make the cakes in batches. Preheat the oven to 180C/160C FAN/GAS MARK 4.

Beat the butter and sugar together until light and fluffy then beat in the vanilla, lemon zest and eggs for a further minute. Add the flour, baking powder and xantham gum and beat until just combined. Do not overbeat.

Divide the mixture equally between the tins and bake for. 20-25 mutes until golden and springy.

Leave to cool in the tin for 5 minutes before turning out onto a wire rack to cool completely.

Once cold sandwich the cakes together with whipped dairy free cream of your choice and plenty of lemon curd.


Sunday, 2 November 2014

Ginger, lemon and honey biscuits (gluten free, dairy free)

I promised you a post for apple butter victoria sponge, and was all set to do so until I woke up with a cold. I can't complain too much, it is the 2nd November and my first cold this year so I have done pretty well. My head is fuzzy and I know I will miss something out of the relatively simple but multi stage apple butter blog post. Soon I promise you, soon. 

Instead I offer you a simple recipe for ginger, honey and lemon biscuits. I like to think of these as the perfect healing biscuits if you have a cold. After all honey, lemon and ginger all feature heavily in commerical cold remidies.  And if you don't have a cold? They are still delicious little biscuits to nibble whenever you wish. 

The recipe is based on one for ginger and lemon biscuits by Signe Johansen in Scandilicous baking. As they contain honey I am going to enter them into this months alpha bakes.

Ginger lemon and honey biscuits

50g stem ginger
1 medium egg
20g golden syrup
20g honey
10g stem ginger syrup (from the jar the stem ginger comes in)
zest and juice of 1 lemon
125g non dairy spread (I used pure soya)
125g golden caster sugar
200g GF plain four
1/2 tsp xantham gum
1 tsp baking powder
1/4 tsp bicarbonate of soda

Finely chop the stem ginger, add to a jug and mix in the egg, golden syrup, honey, stem ginger syrup and the zest and juice the lemon. 

In a separate bowl cream the DF spread and sugar together until creamy. Add in half the wet ingredients, 1/2 the flour and the xantham gum, baking powder and bicarbonate of soda then mix to combine. Add the remaining wet ingredients and mix, finally add the remaining dry ingredients and mix until everything is combined. Place clingfilm over the bowl and refrigerate for 1-2 hours.

Preheat the oven to gas mark 5 and line a baking sheet with baking parchment. Place teaspoons full of the dough onto the sheet, making sure to leave 4-5cm between them. 


Bake in the preheated oven for 8-10 minutes, until golden round the edges. Transfer to a wire rack to cool. 


I really like these biscuits, they are light, not heavy and crunchy like regular ginger biscuits (which I also love) and the lemon adds a freshness to the ginger. They will keep in an airtight tin for at least a week. If they start to go soft blast them in the oven for a couple of minutes to crisp them up.  


Tuesday, 26 August 2014

Lemon semonlina cake

I had lemons in the fruit bowl and a massive bag of semolina in my cupboard, so when deciding what to bake this weekend it seemed like fate that I found this recipe for lemon semolina cake in the first book I was flicking through.

This is a recipe from Peyton and Byrne, British Baking.


Lemon Semolina Cake (Peyton and Bryne)

125g dairy free spread (I use pure)
125g caster sugar
125g ground almonds
3 medium eggs
3 tbsp dairy free milk (I used almond milk)
Zest and juice of two lemons
1/2 tsp vanilla paste/extract
125g semolina flour
1 tsp baking powder

Preheat the oven to 170/150C FAN/ GAS MARK 3. Grease a 900g loaf tin and line the base with a stip of parchment paper.

Beat together the DF spread and sugar until pale and creamy, add the almonds and mix well. Add the eggs one at a time, making sure each is incorporated before adding the next. Stir in the milk, then add in the lemon zest and juice and vanilla extract. Sift in the semolina and baking powder and mix into the batter.

Spoon the batter into the prepared tin and smooth into the corners. Bake for 40-50 minutes or until a skewer inserted into the centre comes out clean. Remove from the oven and allow to cool in the tin for 10 minutes before turning out onto a wire rack to cool completely. 

This cake will keep well for 3 or so days in an airtight tin


The recipe suggests dusting with icing sugar and serving with fresh berries


Saturday, 26 July 2014

Rose lemonade marshmallows

I am a bad blogger. First I chose to do a PhD and had to write a thesis, when you spend all day writing you DO NOT want to write a blog post. Then I had to organise moving house. Then I got told by the doctor no dairy OR gluten. Then I moved house, and still have no internet.

Well I am now just doing corrections on my thesis so I am happy to write blog posts again. I am all moved (hurrah), still no internet but starbucks has come to the rescue with free wifi. The dairy and gluten thing can be tricky when out and about but actually with a few tweaks baking is absolutely fine, and I actually quite like the challenge of making delicious cakes that do not make me sick and that nobody else can tell are free from dairy and gluten.

As an aside my mum is amazing, she loves baking, I think I get that gene from Her, and when I was down last weekend she made an amazing lime and coconut cake, dairy and gluten free, Thanks mum!

I present today some rose lemonade marshmallows. The letter for alpha bakes this month was R and I realised yesterday this was due... oops.

I decided to use rose as I do like it but find some things made with rose are a tad overpowering. I have previously made champagne marshmallows and decided to adapt the recipe. My idea was to mix rose cordial with lemonade and use in place of the champagne. Imagine my surprise when I stumbled across the is rose lemonade by Fetimans in Waitrose. My mixing was already done for me! By the way, I drank the extra, its delicious.

This recipe makes oodles and oodles but they will keep well in an airtight container. I love packaging them up in cute bags and tying with pretty ribbon to give away as gifts!


Rose lemonade marshmallows

3 sachets gelatine
250ml rose lemonade
340g caster sugar
325g golden syrup
Pink gel colouring
30g icing sugar
30g corn flour

Combine the icing sugar and corn flour in a bowl. Lightly oil a 13 by 9 inch pan (I used my brownie tin) and thoroughly coat in ~ 1/2 the icing sugar mix, reserving the rest.

Put the gelatine into the bowl of a free standing mixer. Add 125ml of the rose lemonade and allow to soften.

Meanwhile put the sugar, golden syrup and remaining rose lemonade into a heavy bottomed saucepan. Warm over a medium heat until the sugar has dissolved. Increase the heat to medium/high and cook until the syrup reaches 240F on a sugar thermometer.

Remove from the heat and immediately start the mixer on slow. Carefully pour the hot syrup down the side of the bowl onto the gelatine.

Increase the speed of the mixer and beat for 12 minutes. Add a little colouring (a little goes a long way!) and beat for a further couple of minutes.

Scoop the sticky mass into the prepared pan, smooth over and sprinkle with the remaining icing sugar mix.  Leave for a least 4 hours or overnight then cut into squares.
More blog posts are on the way.. I am going to bake my first cake in the new oven this afternoon... wish me luck!

Monday, 12 May 2014

Earl grey and lemon scones

Picture the scene, perfectly brewed earl grey, a slice of lemon and a freshly baked scone. Hmmmm, a perfect match. So perfect in fact, how about if we merged them? This idea came about as 1) I wanted fresh scones for breakfast and 2) the letter for this months alpha bake is 'E'.

I decided to soak raisins overnight in earl grey tea, before incorporating them into my scone along with plenty of lemon zest.

Earl grey and lemon scones

Earl grey tea bag
60g raisins
120ml almond or soya milk
1/2 tsp apple cider vinegar
185g plain flour
120g oats
50g golden caster sugar
2 tsp baking powder
3/4 tsp bicarbonate of soda
Pinch of salt
110g dairy free spread (I use pure)
Zest of a lemon
1/2 tsp vanilla paste/ extract

The night before you make the scones, make a strongish small cup of earl grey tea, and soak the raisins in it overnight. Come morning they will be plump and infused with earl grey.


Preheat the oven to 180C/160C FAN and dust a baking sheet with flour. Mix the milk and vinegar together and set aside to curdle.

Mix the flour, oats, sugar, baking powder, bicarbonate of soda and salt. Rub the dairy free spread in with your fingertips until the mix resembles breadcrumbs. Stir through the zest of a lemon. 

Add the vanilla to the milk and stir the milk mix into the dry ingredients until just combined, do not overmix. Dollop 8 equal blobs onto the baking sheet and bake in the oven for 20-25 minutes until golden. 


Transfer to a wire rack to cool a little before enjoying warm with butter, lemon curd, marmalade or jam.

Enjoy any leftovers the next day refreshed in a warm oven for five minutes.


The lemon and earl grey complement each other beautifully, the earl grey adds a fragrance and takes away a little of the sweetness of the raisins. For an experiment I was very pleased and would definitely make them again.

Tuesday, 1 April 2014

Lemon and coconut bundt cake

I have a horrible feeling my poor blog will suffer a little whilst writing my PhD thesis, it's only being a week and a bit and I have not managed a post. To be honest after a day of writing the last thing I want to do is do more writing.

Interestingly my thesis writing is definitely going to be fueled by cake, so there will still be lots of baking... Enough chat I have four baked goods not yet posted so I better get on it!

First up is one of the baked goodies I took to work for my birthday last week. I wanted something without nuts and chocolate or dairy to cater to everyone's allergies and/or Lenten promises! This lemon and coconut cake came to the rescue. It attracted my eye as quite often coconut is paired with lime. It was simple to make and although it is vegan it required no tricky to get hold or unusual ingredients.

The cake itself tasted lovely, the lemon contrasted nicely with the coconut. The texture was lovely, no one at work could believe it was vegan. Apologies for lack of pictures, I forget when I take things to work the opportunity to take a photo before its devoured is very very slim.

The coconut theme will be continuing shortly, my mum made an amazing lime and coconut cake when I went home for my birthday, it was amazing, I had to have two slices in one day, just to check it was amazing you understand. I will have to get that recipe...

And about to come out of the oven is yet another coconut cake... This time with orange! My own creation it will appear on the blog soon.

Wednesday, 26 February 2014

Zucchini (courgette) and lemon bundt cake

Once again I am back from a week away in the Czech Republic and have subsequently gone baking mad this weekend.

First up is a simple but delicious cake, that is packed with some hidden veg! I am entering it into this months alpha bakes as the letter this month is the rather tricky z. I lived in America for a little while so I do not feel too cheeky using the American word, zucchini, instead of courgette.

The courgette adds moisture and pairs well with the zingy lemon. You could peel the courgette if you do not want flecks of green in your cake, or if you want to hide the courgette and feed it to a veg hater. I did not peel it because I was lazy and also think the green flecks are pretty.

Zuchinni and lemon bundt cake

2 medium courgettes
170g butter
3 eggs
300g caster sugar
Zest and juice of a lemon
1/2 tsp vanilla
200g self raising flour
Pinch of salt

Preheat the oven to 160C/140C FAN and grease and flour a bundt tin. 

Coarsely grate the courgette and using a clean tea towel squeeze out the water. 


Gently melt the butter over a low heat and set aside.

With a fork whisk briefly the eggs and sugar together to combine them. Again with a fork, whisk in the butter, lemon zest, a tablespoon of lemon juice, vanilla and courgette. Finally whisk in the flour and salt.

Pour into the prepared pan and bake in the preheated oven for 50 minutes until golden and springy.

Allow the cake to cool in the tin for '15 minutes before turning out onto a wire rack to cool completely.


I like this cake just as it is, no glaze or icing, a sprinkle of icing sugar was all it needed to make it smart enough for morning tea.


This cake was so good, it had people coming back for seconds. The courgette made the cake moist but not damp, and the lemon provided freshness and flavour. This is one to make again and NOT take into work!


Tuesday, 17 September 2013

Lemon drizzle cake

I love being creative in the kitchen and pushing myself out of my comfort zone but sometimes I just want to make and more importantly eat something just that bit simpler, and a simple slice of cake, without icing and frosting, to go with a cup of tea was what I was craving.

I made a simple lemon drizzle cake, the recipe is from the hummingbird bakery but I adapted it to make it dairy free and reduced the sugar.

The recipe makes a lot of batter, I have the bigger size loaf tin and there was way too much mix. Luckily I have mini loaf tins too and so I recruited them and actually ended up with one loaf and two mini ones! Luckily the cake keeps well in an airtight tin!

Lemon drizzle loaf (s!)

200g lactofree spread
275g golden caster sugar
3 eggs
½ tsp vanilla paste
Zest of two lemons
350g self raising flour
250g unsweetened almond milk

25g caster sugar

Juice of one and half lemons

Preheat the oven to 170C/150C FAN and grease and line the base of a 2lb loaf tin (have the mini ones on standby!)

Gently melt the butter (or lactose free alternative) and set aside to cool. Using a hand held or free standing electric whisk beat the eggs and sugar till thick, light and mousse like. eat in the vanilla and lemon zest. Add in a third of the lemon and beat until incorporated  beat in a third of the milk. Continue adding the remaining flour and milk in this way Finally eat in the melted butter, on slow, until no streak remain.

Pour the batter into the prepared tin(s), filling n more than 3/4 full. Bake in the preheated oven for 65-75 minutes, until risen, golden and springy.  

While the cake is cooking make the syrup. Heat the sugar with the lemon juice until thickened and a syrup consistency. 

When the cake comes out of the oven transfer to  wire rack and use a skewer or cocktail stick to make holes two thirds of the way down the cake. Brush the syrup over the cake allowing it to soak in.

This cake does exactly everything I wanted it to. The perfect mate to a hot drink after a long day. 

Monday, 26 August 2013

Bake along with bake off - Victoria sponge

Apologies for the lack of posts of late, I had a couple of epic disasters (who forgets to put fat in a cake?!) then went away.

I am back now and hope that all baking disasters are firmly behind me, especially as I had the idea of baking along with The Great British Bake Off each week.I will only be doing one of the challenges each week, not the signature, technical and showstopper, I do not think my waistline would thank me for that!

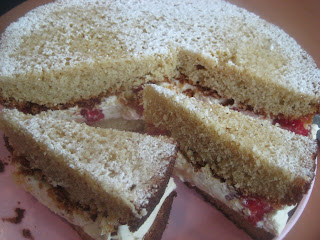
The first week was cake and so I decided to do my signature victoria sponge. As Mary said she wanted no plain and boring jam sponges, I made mine a lemon and raspberry victoria sponge. It is a lemon and vanilla sponge filled with lemon curd, raspberries and vanilla chantilly cream.


Lemon and raspberry victoria sponge

3 eggs, weighed with shells, room temperature
Same weight of butter
Same weight of sugar
Same weight of self raising flour
Tsp vanilla paste
zest of lemon
Tsp baking powder

Lemon curd
Raspberries
Single cream
1/2 tsp vanilla paste

Grease and line the base of two 20cm loose bottomed cake tins. Preheat the oven to 160C/140C FAN.

Beat the butter and sugar together until light and fluffy then beat in the vanilla, lemon zest and eggs for a further minute. Add the flour and baking powder and beat until just combined. Do not overbeat

Divide the mixture equally between the tins and bake for. 25-30 mutes until golden and springy.

Leave to cool in the tins for 15 minutes then transfer to a wire rack to cool completely.

Once the cakes are cool sandwich them together with plenty of lemon curd, vanilla cream and fresh raspberries.


Confession time. This cake tastes absolutely beautiful, I urge you to try it but there were a couple of niggles, these would hopefully not have seen me kicked off the bake off but I certainly would not be winning star baker!

Firstly in true bake off style I dropped my cake. Not onto the floor but a couple of inches onto the worktop, while it was still in the tin. My beautiful risen cake now had a little dip in it. I simply turned it over hoping the filling would hide it...

Secondly I have a super hot oven and have accepted that the edges of my cake will brown. I know Paul and Mary are not fans of this, who was it who grated off their dark edges last year?
Dark edges!
All said this was a yummy cake and I am 100% happy with my efforts!

Bread next week, always and interesting one!


Monday, 13 May 2013

Lemon meringue cake

My parents were visiting this weekend and I always like to have a baked good of some sort to have with tea/coffee on Sunday morning. Both my parents like lemon, (Dad especially is a lemon fiend!) so something lemon based was decided upon.

I also wanted a chance to use the cooks blowtorch that they had given me for Christmas  As luck would have it I have recently bought John Whaite's book and inside was the answer to all my requirements. A lemon meringue cake!

I tweaked the recipe a smidgen as I did not need a 3 layer cake for just the four of us, and I do not think it will keep long due to the nature of the frosting. I made one cake using 2/3s of the listed ingredients and cut it in half once cooked.

Lemon meringue cake

150g butter
150g golden caster sugar
1/2 tsp vanilla extract/paste
2 and 1/2 eggs 
zest of one lemon
150g self raising flour
50g ground almonds
Juice of 1/2 lemon

lemon curd, to taste, but I used about 3 tablespoons worth

3 egg whites
1/2 tsp cream of tartar
150g caster sugar

Preheat the oven to 160C140C FAN and grease and line the base of a loose bottom cake tin. 

Beat the butter with the sugar and vanilla until very light and fluffy. Add the eggs a little at a time, continuing to beat the mix, add the lemon zest with the last bit of egg. Sieve the flour over the wet ingredients, add the ground almonds and gently fold in. Finally stir in the lemon juice.

Pour the mix into the prepared tin and level the top. Bake in the preheated oven for 25-35 minutes until golden. 

Allow the cake to cool for a few minutes in the tin then transfer to a wire rack and allow to cool completely.

Once the cake is completely cool use a sharp serrated knife to slice the cake into two layers. Spread a generous layer of lemon meringue over one of the layers, don't sandwich the cakes together just yet though. 

In a heatproof bowl, whisk the egg whites with the cream of tartar until semi firm peaks form. 

Place the caster sugar in a saucepan with 2 tablespoons of water. Heat over a medium heat, without stirring until it reaches 118C, or the soft ball stage. I used my new thermospatula from Lakeland.

Once the sugar has reached the correct temperature remove immediately from the heat. With the electric whisk on a medium speed pour the sugar syrup onto the egg whites in a steady stream. Keep beating until the meringue frosting is cool. This will take between 5-7 minutes.

Spread a little of the frosting over the lemon curd and sandwich the second layer of cake on top.

Pile the rest of the frosting onto the cake, making sure to cover the sides. I used a palette knife to create peaks and swirls but you could use a piping bag to pipe the frosting on. 

If you do not own a blow torch the cake looks pretty already. 

If you do have a cooks blowtorch then the frosting can be lightly toasted for a dramatic affect.

This cake was declared a huge success all round. I kept in in the fridge and it was just as good the next day, the frosting had kept well, probably due to the cream of tartar. 

Thursday, 28 February 2013

Lemon and poppy seed loaf

Still continuing with non chocolate bakes considering I am off chocolate for lent. Sometimes my bakes can get chocolate orientated as it is so versatile  and I usually have some in the cupboard! Its good to break out and bake plenty of things that I have been eyeing up for a while.

This is a delicious loaf that goes well with a cup of tea. There is a nice lemon flavour throughout the cake with a fantastic lemon glaze that packs a nice citrus punch. The poppy seeds add a welcome crunch ad slightly savoury edge which I find particularly welcome in the this soft sweet loaf.


Lemon and poppy seed loaf

130g butter
200g caster sugar 
2 eggs
zest of 1 large lemon
235g plain flour
1 tsp baking powder
165ml milk (semi skimmed or whole)
1 tsp orange blossom water
30g poppy seeds

Juice of a large lemon
50g caster sugar

Preheat the oven to 170C/150C FAN and grease and flour a 900g loaf tin.

Gently melt the butter and set aside to cool. Put the sugar, eggs and lemon zest in a bowl and whisk until thick, moussey and pale in colour. Combine the baking powder and flour and add ~1/3 to the egg mixture and beat to combine, then beat in ~1/3 of the milk. Repeat until all the flour and milk has been incorporated. Finally beat in the orange blossom water and poppy seeds.

Pour the mixture into the prepared tin and bake in the oven for 65-75 minutes until golden brown in colour and springy when lightly pressed with a finger. 

While the cake is baking make the glaze. Put the lemon juice, sugar and 100ml of water into a saucepan and gently bring to the boil. Increase the heat and continue to boil until it is well reduced and thick and syrupy.

When the cake comes out of the oven brush with the glaze straight away. Add another layer of glaze 10-15 minutes later and transfer the cake to a wire rack. As it is cooling keep adding more glaze until you have used it all up.


This simple cake will keep well in a tin for up to 5 days and keeps its flavour and texture very well. 

Thursday, 17 January 2013

Daisy cupcakes

As you may well imagine I received a plethora of baking/ cooking related gifts for Christmas (including a blowtorch!), among them were cute little wafer daisies.

I imagine these daisies could be used in a while number of ways to pretty up your bakes, I myself used them to decorate little orange and lemon cupcakes, these cupcakes are lovely to eat but to look at, perhaps not the most exciting. These little daises are perfect for making them look as fresh and 'springlike' as they taste (Yes I know its January and -2, but I am allowed to dream of spring)

I am going to be a little sneaky and enter these into this months alpha bakes, the letter this month is 'D' and D is for daisy!

Orange and lemon daisy cupcakes

makes between 10 and 12 depending on cupcake liner size

80g butter
50g natural yoghurt or low fat natural yoghurt (not fat free)
125g caster sugar
zest and juice of a lemon
zest and juice of an orange
1 large egg
130g self raising flour
1 tablespoon of milk

125g butter
250g icing sugar
1/2 tablespoon of milk

Preheat the oven to 180C/160C FAN and line a cupcake tin with cupcake cases.

Beat the butter, sugar and zest of the orange and lemon until light and fluffy. Beat in the yoghurt until combined. Add the egg and beat for a further minute. Beat in the flour on slow until just incorporated. Add the milk, 1/2 tablespoon of the orange  juice and 1/2 tablespoon of the lemon juice and beat for a final minute. Divide the mix equally between the cupcake liners, filling them 2/3 full. Bake for ~20 minutes until golden and spring, transfer to a wire rack to cool fully.

For the frosting beat the butter and icing sugar until combined. add the milk and beat until very light and fluffy. Add 1/2 tablespoon of each of the lemon juice and orange juice and beat for a further minute.

Frost the cupcakes and top with a wafer daisy. Et VoilĂ . 


Thursday, 10 May 2012

Lemon and coconut squares

So I asked M if I should bake biscuits, cupcakes or a traybake. He said traybake, excellent I thought, I  had wanted to try out blondies with pecans and peanut butter chips. Alas he did not really want nuts and thought that brownies made with white chocolate would be too sickly sweet.

So back to the drawing board. He then said he remembered something from his childhood. A lemon coconut square thing. He remembered it had lemon and coconut and that it was really nice.

So working on limited information I tweaked a lemon square recipe, adding coconut to the biscuity base. Upon eating them they were declared yummy but not like the ones from his youth. These, in fact, we have worked out seem to have a 15 (digestive, marshmallow, coconut and condensed milk) base topped with more of a lemon icing, not a baked curd. I will never make these as 15s are so excruciatingly sweet that it hurts, and with more sugary icing on top I think I would have a hyperglycaemic attack! And so I am afraid it is my lemon coconut hybrid that will have to be put up with. And yes I do see the irony that he will eat the sugar fests of his youth but not a white chocolate brownie. Mind you he has said he is willing to be proved wrong.

The recipe below produces lovely lemon squares, the curd is definitely lemony enough, and the coconut adds a welcome different dimension to the shortbread style base.

Lemon Coconut squares


For the base:


230g plain flour
85g icing sugar
160g butter
100g dessicated coconut


For the topping:


3 lemons
4 large eggs
400g caster sugar
50g plain flour


Heat the oven to 180C/160C fan and line the sides and base of your tin with baking parchment. A brownie pan is the perfect size.


Put the base ingredients into a food processor and whiz until it forms fine crumbs. Tip into the prepared tin and smoothly level with the back of spoon, ,pressing it down lightly. Bake for 20-25 minutes. 


For the topping finely grate the zest of the lemons, and squeeze all the juice, you need 100-120ml. Whisk together the eggs and sugar, using an electric whisk for 1 minute. Add the zest and juice and whisk briefly to mix. Add the flour and whisk well to mix.


Pour the topping over the base and bake for 15-20 minutes, until the topping has just set.
The topping about to go into the oven
Leave to cool completely in the tin. I had to cover with foil and put it in the fridge overnight.


Lift out of the tin using the paper and dust with icing sugar. Cut into bars and enjoy.


Tuesday, 3 April 2012

Lemon and Cardamom cookies

I was very excited to receive the Hairy Bikers Bakation book for my birthday, and only one chapter in I wanted to make everything!
Waiting around for our internet engineer to arrive seemed an excellent opportunity to start baking from this great book.

Now it has to be said these may not be the prettiest cookies to look at but they taste divine. The bikers suggest you could use a cookie press to make them prettier, however I do not have one (but it has been added to my mental list of kitchen stuff I want!).

Lemon and Cardamom cookies (from Hairy Bikers Bakation)

Recipe makes 24

225g butter
150g butter
Zest of one lemon
250g plain flour
100g ground almonds
1 tsp of ground cardamom seeds (this is approximately the seeds of 10 pods ground with a pestle and mortar.

First line two baking sheets with parchment paper and preheat the oven to 190oC/fan170OC

Grind up the seeds of the cardamom pods and set aside.


Cream together the butter, sugar and lemon zest until light and fluffy.


Add the flour, almonds and ground cardamom, beat on slow to combine until the dough comes together. You may need to use your hands to get the dough completely together.

Roll into 24 balls and place onto the prepared sheets. Either stamp with a cookie stamp or flatten with a glass.


Bake for 12-14 mins until golden around the edges. Leave to cool for a couple of minutes on the sheet and then transfer to a cooling rack. They will crisp up as they cool.

So as I said maybe not the prettiest, I am going with the very rustic homemade look. But no matter as they are the perfect thing to have with a cup of tea.