Showing posts with label Cake. Show all posts

Monday, 26 January 2015

Lemon Victoria Sponge

January seems to go on forever doesn't it? Its still cold and dark but without the sparkle of Christmas lights in December and pay day seems ages away, for me personally when I get paid on Wednesday it will have been 40 full days since I was last paid. This sunshine like cake is enough to brighten the dark poor days and reminds us that spring IS on the way.

If you do not need to follow a special diet you can use butter, dairy cream, any lemon curd and wheat flour, simply omit the xantham gum. 


I will enter this cake for alpha bakes as the letter this month is L.


Lemon victoria sponge

3 eggs, weighed with shells, room temperature
Same weight of dairy free spread
Same weight of sugar
Same weight of GF plain flour
1 tsp baking powder
1/2 tsp xatham gum
Tsp vanilla paste
zest lemonLemon curd (I made my own, so it was dairy free)
Dairy free cream
Grease and line the base of two 20cm cake tins, if like me you do not have two tins then make the cakes in batches. Preheat the oven to 180C/160C FAN/GAS MARK 4.

Beat the butter and sugar together until light and fluffy then beat in the vanilla, lemon zest and eggs for a further minute. Add the flour, baking powder and xantham gum and beat until just combined. Do not overbeat.

Divide the mixture equally between the tins and bake for. 20-25 mutes until golden and springy.

Leave to cool in the tin for 5 minutes before turning out onto a wire rack to cool completely.

Once cold sandwich the cakes together with whipped dairy free cream of your choice and plenty of lemon curd.


Sunday, 18 January 2015

Sticky toffee pudding cake

I am a recent convert to sticky toffee pudding and now I cannot get enough of it comforting sticky goodness. It was cold and dark outside and the news was somewhat depressing and I decided a comforting cake was needed. So I concocted a plan to put all the comforting loveliness of sticky toffee pudding in a cake.

This cake was a bit of an experiment but it did all it was supposed too and more. It was absolutely delicious warm from the oven with a little yoghurt and drizzle of maple syrup. It also kept very well and was perfect with a morning cuppa.

I reckon with buttercream of your choice and a bit of decoration this could be an excellent celebration cake as an alternative to chocolate.

I love this cake so much that is is a strong contender to be a layer in my wedding cake... if that does not convince you to try it I do not know what will!


Sticky toffee pudding cake

150g pecan
200g stoned dates
200g dairy free or lactose free spread (I used lactofree this time)
140g light brown sugar
1 tsp vanilla extract
4 medium eggs
140g self raising GF flour

Heat oven to 180C/fan 160C/gas 4. Butter and line the base of a 20cm springform cake tin.

Tip 100g of the pecans into a processor and whizz until fine then continue to process until it becomes a paste, like peanut butter. Add the dates and blend until a thick smooth paste forms. If your dates are a bit dry put them into a small pan with enough water to cover, boil for 5 mins until very soft. Drain, discarding the liquid, then whizz in the processor with the ground pecans until smooth. 

Beat the butter, sugar and vanilla together until light and creamy, then tip in the dates and pecans paste, eggs and a pinch of salt and beat briefly until smooth. Fold in the flour with a metal spoon, then spoon into the tin and level the top. 


Sprinkle the remaining nuts over the top (don’t press them in), then bake for 1 hour mins or until risen and golden and a skewer comes out clean. You may have to cover the top of the cake with foil to stop the top of the cake and pecans catching and getting too dark.

Leave to cool in the tin for 15 minutes before transferring to a wire rack to cool  completely.


Saturday, 22 November 2014

Cherry and almond loaf (gluten free, dairy free)

This is a good loaf cake for using up any leftover glacé cherries you may have lurking after your Christmas cake/pudding/mincemeat baking. Of course it you have no leftover cherries go by some because this is an amazing cake!

You may notice that the weights are in ounces, except the ground almonds which are in grams, this is because I stole the recipe from my mum.

I took this cake into work to celebrate the fact I passed my viva... 4 years of work but I am now a Dr. Finally I can have a break from reading about science and get baking and blogging.

As always if you do not have an issue with butter or gluten feel free to substitute the DF and GF components with their regular counterparts.


Cherry and almond loaf

6oz dairy free spread (I use pure)
6oz golden caster sugar
3 eggs
tsp almond extract
6oz GF plain flour (I use dove farm)
1/2 tsp xantham gum
4tsp GF baking powder
100g glacĂ© cherries, chopped into 1/2 or 1/4 depending on their size
75g ground almonds

First preheat the oven to gas mark 4/180C and grease and line a 2lb loaf tin. Beat the DF spread and sugar until creamy then beat in the eggs one at a time,  followed by the almond extract. Beat in the flour, xantham gum and baking powder until it is just combined. Rinse the cherries and dry on kitchen paper, this prevents them from sinking to the bottom of your cake. Toss the cherries in the ground almonds, this also helps them stop sinking. then fold the cherries and almond into your cake mix until the cherries are evenly distributed.

Transfer the cake mix to your prepared tin and smooth with a spatula. Bake in the preheated oven for 40-50 minutes (mine took just over 40) until golden and a skewer comes out clean. Allow the cake to cool in the tin for 10 minutes before transferring to a wire rack to cool completely. 


I took a little mix out of the big loaf tin to make a baby cake for the two of us to eat as a tester before I took the big one to work! Sorry for the dark photo, it was evening. I really need to work on my camera skills, if anyone has any tips do let me know!

Saturday, 11 October 2014

Schichttorte

What will we do on Wednesday nights now that bake off is over? The final was thrilling and I am so pleased that my favourite won, my favourite never wins... I jinx them from the start simply by liking them!

The wee before the final was patisserie week and the bakers had to create two types of baklava, two types of entremets and a schichttorte. The first two I had heard of, the last I not not. Looking it up I was instantly intrigued, a grilled cake? Would it taste different to a baked cake? There was only one way to find out.

I used the recipe from Paul Hollywood found here. I made tweaks to make it gluten and dairy free, and also had to turn my grill down and cook for 30 seconds less than stated. 


Admittedly it does have the wow factor when you cut into it, all those layers. When I first tried a slice I did not know what to expect and so was not overwhelmed with the texture of the cake, I think I prefer my cakes baked not grilled. Having said that over the next few days the cake grew on me and I have decided I do quite like it after all. Whether I like it enough to spend two hours making one again remains to be seen. Oh and the chocolate glaze is immense. 

In final week I absolutely loved how the bakers went back to basics for the technical challenge. I firmly believe a good knowledge of the basics is what makes a consistently good baker and Nancy helped prove me right by nailing it. 

For my final bake along with bake off bake I am going to make scones, mini victoria sandwiches and some form of mini patisserie and aim to make them all perfect. I will do this next weekend when my parents come see my new flat for the fist time,after walking the hills of Edinburgh I am sure everyone will be ready for a cup of tea and a cake or two!


Sunday, 21 September 2014

Blueberry crumble cake

Last week it truly felt like autumn was here, it was colder, dark when I got up, dingy and grey. The only way to combat this was a comforting cake made with cinnamon and fruit, I did not quite veer into the autumn fruit territory (apples, blackberries, pears) but used some Scottish blueberries. a last hopeful cling on to summer. It worked we got a mild reprise to summer this weekend with plenty of sunshine and blue skies!

The cake is from this months good food magazine, I adapted it a little to make it gluten and dairy free and also enough to fit into a brownie tin.

The crumble topping is fantastically crisp and contrasts perfectly with the soft cake and fruit. This cake is best eaten as soon as possible as it contains fresh fruit. Also the sooner it is eaten the crisper the topping will be.

Oh and sorry for the dark photos... that is partly down to me wanting to eat it and partly down to the rubbish autumn weather I mention previously!


Blueberry crumble cake (adapted from bbc good food magazine)

150g dairy free spread (I use pure, sunflower)
225g golden caster sugar
300g GF plain flour (I use Dove farm blend)
1 tsp xantham gum
1 1/2 tsp GF baking powder
1/2 tsp bicarbonate of soda
3 medium eggs, room temperature
1 tsp vanilla paste/extract
180g natural soya yoghurt
1 1/2 tbsp non dairy milk (I used almond milk)

1 tbsp and 1 tsp of ccinnamon
2 tbsp each of golden caster sugar and brown sugar (light or dark). mixed
200g blueberries
6 tbsps GF plain flour
3 tbsps dairy free spread, cut small

Preheat the oven to 180C/160C FAN. GAS MARK 4 and grease and line a brownie tin (or traybake tin) with baking paper.

Beat the DF spread and sugar with an electric whisk until fluffy. Add the flour, xantham gum, baking powder and bicarbonate of soda to the bowl followed by the eggs and vanilla, beat until smooth. Add the yoghurt and DF milk and briefly beat until combined.

Spoon just under half of the mix into the prepared tin. Mix 1 tablespoon of the cinnamon and 2 tablespoons of the sugar mix and scatter half of this over the cake followed by half of the berries. Layer over the remaining cake mix, take care when smoothing it out the berries will want to come with you. Sprinkle over the remaining sugar/cinnamon mix followed by the remaining berries.

To make the crumb topping place the remaining sugar mix, flour and DF spread into a bowl and rub together until the mixture resembles chunky breadcrumbs. Sprinkle the crumble topping over the cake, squeeze some of the crumble together to make bigger chunks as you do. 

Bake the cake for 35-40 minutes, until it is risen all the way till the centre. looks golden and the topping is crisp.

 Cool the cake in the tin for 15 minutes then transfer to a wire rack, using the baking paper to help you lift the cake, to cool completely.


Friday, 12 September 2014

Kugelhopf

So continuing along with the bake off you may have noticed I do not have a post for tarts and pies week. Well I did attempt to make a pie, I was terrified, a gluten and dairy free pastry was not an experiment I was looking forward to. The pastry I made was lovely and delicious, but it was meant to be puff pastry, something I never had problems with in the past,  and it turned out like shortcrust. I will reiterate it was lovely but I am not posting the recipe I used as it did not turn out as it should. I get to do pastry again soon though as next week is pastry week on the bake off! I show a picture of my pie to prove that I tried.


This week was the week of European cakes. The contestants had to make a European cake that was raised with yeast, a Swedish princess cake or a Hungarian dobes torte. I have never made a princess cake but I have eaten cakes consisting of sponge, jam, cream and creme pat and so I decided to go with the more interesting cake raised with yeast as I have never made/eaten one before.

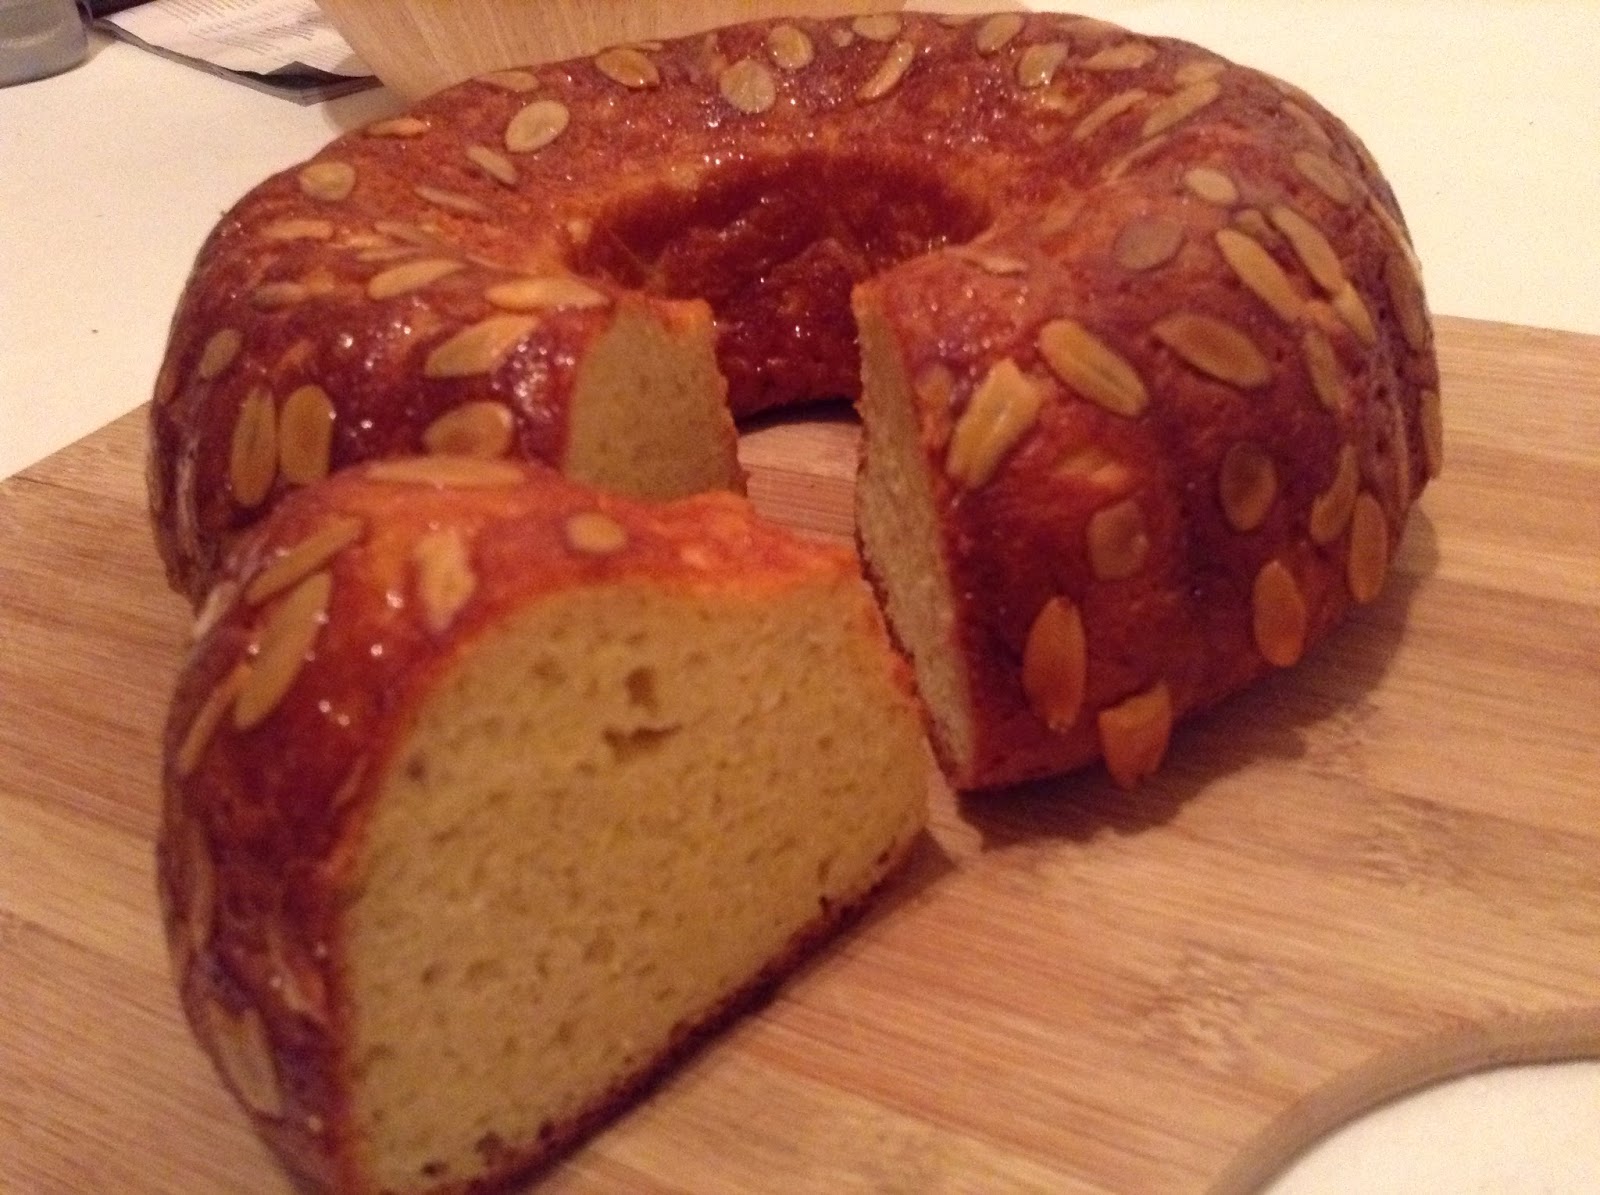
I decided, like some of the contestants, to make a Kugelhopf. This is traditionally a cake raised with yeast, filled with fruit and cooked in a bundt tin. Like many of the contestants I changed my flavours, I went for cardamom, orange and almond. I also had the added challenge of making it gluten and dairy free.

I have also just remembered that this months letter for alpha bakes is K and so I will enter my Kugelhopf!


This is an experiment that worked and I am so so pleased with it, it smelt good baking, looked fantastic and also tasted great. It is very interesting, it is definitely a cross between bread and cake and those with palettes used to very sweet cakes will probably take a while to adjust. It is lovely as a plainer cake and dare I say it could even be eaten as breakfast (which I did). It does not keep so long so I have sliced it and individually wrapped slices and frozen them, I will refresh in the oven when I fancy a snack or breakfast.

Orange, cardamom and almond Kugelhopf 

380g GF flour (I used dove farm plain flour blend)
60g ground almonds
2 tsps xantham gum
Seeds of 15 cardamom pods, crushed in a pestle and mortar
120ml warm water
4 1/2 tsp active dried yeast (not instant yeast)
1/2 tsp sugar
120g DF spread (I used pure sunflower)
75g golden caster sugar
2 tsp salt
3 eggs
2 tsp almond extract
Zest and juice of an orange
2 tbsp caster sugar
a little melted butter to grease
slivered almonds to decorate (optional


Place the warm water, yeast, and ¼ teaspoon sugar together in a small bowl. Stir until yeast is dissolved. Set aside for 10-15 minutes until the yeast is foamy

Place 220g of the gluten-free flour in a freestanding large bowl or the large bowl of a large stand mixer. Add the xanthan gum and cardamom and mix to combine

In a small saucepan, heat the milk, butter, sugar, and salt. Stir until sugar is dissolved, do not let it boil.

In a medium bowl whisk  the eggs together with the almond extract and orange zest. Carefully add the milk mixture in a slow, steady stream to the eggs and whisk well. Be sure to add the milk slowly so it doesn't curdle the eggs. 

Turn the mixer on low, or using a hand held electric whisk add the milk and egg mixture in a slow steady stream to the flour mix. Raise the speed to medium and mix until smooth. Lower the speed and add the remaining flour and ground almonds. The dough should be fairly sticky and smooth, but not too stiff. Turn off mixer and let dough stand for a few minutes.

Grease a bundt pan with melted butter. if desired stick slivered almonds onto the sides of the greased pan.

 Carefully transfer the dough to the pan and smooth it evenly. Brush the top with the melted butter to prevent it drying out. 

Cover with cellophane or place in a bag and let rise for 45-60 minutes in a warm place. The dough won't have doubled, but it will have risen quite a bit.

While the dough is rising preheat the oven to GAS MARK 6 . Bake for 40-45 minutes, or until golden and baked through.

Let cool in the pan for a few minutes, then transfer to a wire rack to finish cooling.

To make a glaze put the remaining sugar and orange juice in a pan and heat gently until the sugar had dissolved, turn up the heat and reduce until the mixture is syrupy. Brush this over the cooled cake then enjoy.


Tuesday, 26 August 2014

Lemon semonlina cake

I had lemons in the fruit bowl and a massive bag of semolina in my cupboard, so when deciding what to bake this weekend it seemed like fate that I found this recipe for lemon semolina cake in the first book I was flicking through.

This is a recipe from Peyton and Byrne, British Baking.


Lemon Semolina Cake (Peyton and Bryne)

125g dairy free spread (I use pure)
125g caster sugar
125g ground almonds
3 medium eggs
3 tbsp dairy free milk (I used almond milk)
Zest and juice of two lemons
1/2 tsp vanilla paste/extract
125g semolina flour
1 tsp baking powder

Preheat the oven to 170/150C FAN/ GAS MARK 3. Grease a 900g loaf tin and line the base with a stip of parchment paper.

Beat together the DF spread and sugar until pale and creamy, add the almonds and mix well. Add the eggs one at a time, making sure each is incorporated before adding the next. Stir in the milk, then add in the lemon zest and juice and vanilla extract. Sift in the semolina and baking powder and mix into the batter.

Spoon the batter into the prepared tin and smooth into the corners. Bake for 40-50 minutes or until a skewer inserted into the centre comes out clean. Remove from the oven and allow to cool in the tin for 10 minutes before turning out onto a wire rack to cool completely. 

This cake will keep well for 3 or so days in an airtight tin


The recipe suggests dusting with icing sugar and serving with fresh berries


Friday, 8 August 2014

Swiss Roll

The bake of is back! I know for a fact that I am not the only one thrilled by this, the cakes, the drama, Paul and Mary’s scrutiny and the soggy bottoms make for tasty TV!

Last year I wanted to bake along with the bake off but fell along the wayside thanks to illness and diagnosis with dairy intolerance. Well this year I can no longer eat gluten or dairy. Which poses some challenges for a baker but I am finding I am managing quite well. This year I am going to attempt again to bake along with the bakes off AND adapt their bakes for anyone suffering with any dairy or gluten intolerance/allergy.

The first week saw the 12 new hopefuls make signature swiss roles, tackle Marys cherry cake and produce 36 identical mini bakes… some of the contestants could have done with a dictionary to look up ‘mini’ but everything looked delicious.

I made a swiss roll, I have never made one before and was a little nervous. A swiss roll sponge is naturally a fatless sponge so that solved the dairy conundrum right off! I used gluten free flour and it worked like a charm. I filled it with a strawberry jam, classic and simple.

I was really proud of my first swiss roll, I was a little hesitant when rolling and feel that the swirl could have been tighter but saying that I think Paul and Mary would have not been too unkind… it did taste scrummy!


Jam swiss roll

3 eggs
75g caster sugar, plus extra
½ tsp vanilla paste
75g plain GF flour
1 tsp GF baking powder
½ tsp xantham gum
Strawberry jam to fill

Preheat the oven to 180C/160 FAN/GAS MARK 6. Grease and line a brownie tin, If you happen to have an actual swiss role tin all the better, simply increase the eggs to four and the flour and sugar to 100g each.

Whisk the eggs and sugar together until very pale and thick, when thick enough a ribbon of mix will sit on the top of the mix. This took me about ten minutes with a powerful handheld mixer so be patient! Next very gently fold in the remaining ingredients (except the jam), do not over mix but do make sure all the flour is thoroughly combined. Gently pour the mix into your prepared tin and tilt the tin so that the mixture spreads to the corners. Bake in the preheated oven for ten minutes.

While in the oven sprinkle a piece of parchment, a little bigger than your tin, with caster sugar. When the swiss roll is ready remove from the oven and invert onto the parchment paper.  Trim the edges with a sharp knife, and score a grove an inch from one of the short edges, be careful not to cut all the way through. Spread with jam (its easier to do this if you soften your jam by beating it with a spoon) and then starting with the side with the grove tightly roll up the swiss roll.


A crack is nothing to worry about, it looks lovely and homemade, lots of cracks suggest that your sponge is a little on the dry side.


This is best eaten relatively soon, ours was finished 28 hours after baking. 

Saturday, 2 August 2014

Raspberry frangipane traybake

Another gluten free and dairy free bake, this time a simple tray bake to satisfy a cake craving that did not want to wait around forever to be satisfied.

The cake is icing free but does not need any, the sponge is moist with almonds and the sharpness of raspberry is an amazing flavour pairing.

This is a good cake to have in the tin ready for partnering with a cup of tea and a book!


Raspberry frangipane traybake

200g DF spread (I use pure)
200g caster sugar
1/2 tsp vanilla paste or extract
Tsp almond extract
3 eggs
250g plain GF flour
1/2 tsp xantham gum
2 tsp GF baking powder
50g ground almonds
200g rasperries, halved

Preheat the oven to 180C/160C FAN/GAS MARK 4 and grease and line a traybake tin.

Beat the butter, sugar and vanilla until creamy, add one egg at a time  along with a tablespoon of the flour, add in the almond extract and beat until combined. Add the remaining flour, xantham gum, baking powder and ground almonds and fold in. 

Pour the batter into the prepared tin and level the top. Line the raspberries, cut side down, on top of the frangipane, no need to press in. Bake in a preheated oven for 40-45 minutes until golden and beginning to shrink away from the sides of the tin.

Allow to cool in the tin for 30 minutes -1 hour then transfer to a wire rack to cool completely.


Wednesday, 30 July 2014

Chocolate orange cake (Dairy and gluten free)

I have braved making a cake in my new oven (well not NEW new, I just moved flat)! A different oven is a mystery of a thing, is it a 'hot' oven, a 'cold' oven, is there hot spots? As well as this I had to get used to a gas main oven as opposed to electric.

I have worked out that it is cool oven, I actually prefer this to my old 'hot' oven that used to really brown the edges of my cakes!It has a little hot spot but not as bad as my last oven, so now my cakes rise ever so slightly unevenly as opposed to completely uneven So all in all a bonus.

This cake tastes like a terry's chocolate orange in cake form, really it does. The frosting is amazing I could literally eat it straight from the bowl forgoing the cake BUT if I did that I would miss out on cake so I managed to restrain myself.

I have made this cake completely dairy and gluten free, obviously if you do not have these requirements you could use butter and regular flour and leave out the xantham gum.


Chocolate orange cake

3 eggs, weighed with shells, room temperature
Same weight of dairy free spread (I use Pure)
Same weight of sugar
Tsp vanilla paste
zest and juice of one orangeSame weight of gluten free plain flour minus 30g
30g cocoa powder2 Tsp gluten free baking powder baking powder
1/2 tsp xantham gum
100g dairy free spread
zest of one orange
30g cocoa powder
200g icing sugar
1 tbsp Boiling water


Grease and line the base of two  20cm cake tins, if like me you do not have two make the cakes in batches. Preheat the oven to 160C/140C FAN or Gas mark 3.


Beat the butter and sugar together until light and fluffy then beat in the vanilla, orange zest and eggs for a further minute. Add the flour, cocoa powder, baking powder and xantham gum and beat until just combined. Do not overbeat


Divide the mixture equally between the tins and bake for. 25-30 mutes until springy.
Leave to cool in the tins for 15 minutes then transfer to a wire rack to cool completely.

Once the cakes are cool sandwich them together with the frosting, method below.

To make the frosting melt the butter in pan over a gentle heat then add in the orange zest, add the cocoa powder and cook for 1 minute whilst stirring. remove from the heat and beat in the icing sugar, it will look terrible, like it has split, never fear, add in a tablespoon of boiling water and beat well,  the frosting should now be thick  and smooth, with no sign of splitting, add a tiny touch more water if you feel it necessary


Sunday, 18 May 2014

Cherry and almond tray bake

It's national baking day, so I had to bake, and looking at my books it was clear which one I had to choose a recipe from, after all Mary Berry is the queen of baking!

I decided on a traybake, simple, uncomplicated, quick and delicious. The traybake I decided on was cherry and almond, a classic flavour combination.

 Now I did make a few tweaks, normally I would not tweak Mary's recipes but I am on a budget at the moment (3 weddings to go to in 1 month is expensive!) so I used what I had in the cupboards and did not buy extras apart from the cherries. I think Mary would approve of my thrifty-ness. 

Cherry and almond traybake

225g glacé cherries, my pack was 200g, I used 200g.
225g soft butter
225g caster sugar
1/2 tsp vanilla paste or extract
Tsp almond extract
4 eggs
50g ground almonds
250g self raising flour
Tablespoon of milk
Flaked almonds for topping, I had none but chopped up a few whole almonds

Preheat the oven to 180C/160C FAN, and grease and line a traybake tin.

Chop the cherries into quarters, rinse well with cold water before draining and drying on kitchen paper (or clean tea towel), set aside.

Add all the other ingredients to a bowl except the almonds and mix for a minute until well combined, fold through the cherries.

Pour the batter into the prepared tin and level the top. Scatter over the almonds. Bake in a preheated oven for 40 minutes until golden and beginning to shrink away from the sides of the tin.


Yum, a classic flavour combination and a delicious cake, happy world baking day!

Wednesday, 9 April 2014

Carrot tray bake


I do love a good indulgent piece of carrot cake, this is not a recipe for that style of cake. This is a carrot cake for the days when you need your cake to be less sweet, less showy. It's also perfect if you are not a fan of layers of frosting and the accompanying sugar rush.

It's a great cake to have with a cup of tea, as a small snack that will not ruin your appetite for whatever deliciousness you have planned for later on.

We both liked the flavour of this cake, not very sweet which allowed the carrot, cinnamon and raisins to shine. It was a good texture not too crumbly which made for easy eating. The maple syrup icing was a last minute addition, but a welcome one adding just a little interest. I added chia seeds, purely because I love them and am adding them to everything, feel free to use poppy seeds or just leave the seeds out.


Carrot tray bake

200g carrot, finely grated
120ml maple syrup
180ml almond milk (dairy milk is also fine)
75ml groundnut oil, or other flavourless oil
1 egg, beaten
1/2 tsp apple cider vinegar 
170g white spelt flour (plain white is also fine)
2tsp baking powder
1/2 tsp bicarbonate of soda
Pinch salt
2tsp cinnamon 
1/2 tsp mixed spice
10g of chia seeds, or poppy seeds or omit the seeds
75g raisins

A little icing sugar and maple syrup for the top (optional)

Preheat the oven to 170C/150CFAN. Line a 8 inch square pan and grease the sides and the parchment with a little oil. I used a pan 7 by 8 inches and did not lime it as it was silcon, it worked just fine.

Mix the wet ingredients including the carrot in a medium bowl. In a large bowl mix all the cry ingredients including the raisins. Add the wet ingredients to the dry ingredients a third at a time and mix, by hand, until just combined. Pour into the prepared tin, level the batter with a pallets knife or spoon then bake in the oven for 45 minutes until golden and springy.

Leave to cool in the tin for ten minutes before transferring to a wire rack to cool completely. Once cool, and if desired, mix maple syrup with icing sugar to form a fairly thick icing that will still drizzle of the end of a spoon and artistically drizzle across the top of the cake.


Tuesday, 1 April 2014

Lemon and coconut bundt cake

I have a horrible feeling my poor blog will suffer a little whilst writing my PhD thesis, it's only being a week and a bit and I have not managed a post. To be honest after a day of writing the last thing I want to do is do more writing.

Interestingly my thesis writing is definitely going to be fueled by cake, so there will still be lots of baking... Enough chat I have four baked goods not yet posted so I better get on it!

First up is one of the baked goodies I took to work for my birthday last week. I wanted something without nuts and chocolate or dairy to cater to everyone's allergies and/or Lenten promises! This lemon and coconut cake came to the rescue. It attracted my eye as quite often coconut is paired with lime. It was simple to make and although it is vegan it required no tricky to get hold or unusual ingredients.

The cake itself tasted lovely, the lemon contrasted nicely with the coconut. The texture was lovely, no one at work could believe it was vegan. Apologies for lack of pictures, I forget when I take things to work the opportunity to take a photo before its devoured is very very slim.

The coconut theme will be continuing shortly, my mum made an amazing lime and coconut cake when I went home for my birthday, it was amazing, I had to have two slices in one day, just to check it was amazing you understand. I will have to get that recipe...

And about to come out of the oven is yet another coconut cake... This time with orange! My own creation it will appear on the blog soon.

Thursday, 6 March 2014

Dairy free victoria sponge

In this instance I mean dairy as all milk products, not eggs. Victoria sponge is a classic and one of Mark's favourites, though I must say I am partial to a slice or two myself.

Strawberry and champagne jam was on offer and so I snapped it up and set about making a cake. Mary Berry readily admits to using baking spread instead of butter in her cakes so I was less worried about spurning the butter! I used a 'Pure' soya spread with no nasty additions. Its not that I will not have butter, its that I cannot, I think natural butter is indeed a wonderful thing and I did not want to swap it for fake rubbish.

As well as jam in the middle I added whipped coconut cream spiked with plenty of vanilla. The coconut cream gave a creaminess and was an excellent substitute for double cream, an added bonus is that is is also better for you!


Dairy free victoria sponge

3 eggs, weighed with shells, room temperature
Same weight of butter
Same weight of sugar
Same weight of plain flour
Tsp baking powder
Tsp vanilla paste
Jam of your choice
Can of coconut cream, make sure it is cream not milk

Grease and line the base of three 20cm cake tins, if like me you do not have three make the cakes in batches. Preheat the oven to 160C/140C FAN.

Beat the butter and sugar together until light and fluffy then beat in the vanilla and eggs for a further minute. Add the flour and baking powder and beat until just combined. Do not overbeat

Divide the mixture equally between the tins and bake for. 20-25 mutes until golden and springy.

Leave to cool in the tins for 15 minutes then transfer to a wire rack to cool completely.

Once the cakes are cool sandwich them together with plenty of strawberry jam and coconut cream.

This cake was just beautiful. Light without being dry, it had a substantial cake crumb, it was everything a sponge cake should be. The flavours of vanilla and strawberry are a classic and the champagne in the jam just lifted it to extra special.

Friday, 28 February 2014

Almond topped treacle cake

Arggh I have just realised my scheduled posts have not been going up. So over the next few days there will be new ones all the time!

First up is this interesting cake, interesting in that I was not entirely convinced about it but everybody else loved it and it was demolished at an alarming rate. I concede that it must be a personal taste thing and the majority wins so up on the blog it goes!

Also interesting in that it does not contain treacle just molasses sugar which gives it a super treacle like flavour, if you cannot get hold of molasses sugar I would suggest using the darkest brown sugar that you can get your hands on.


Almond topped treacle cake

3 eggs
150g molasses sugar
tsp good vanilla extract or paste
150g plain flour
1 tsp baking powder
75ml milk (I used almond milk)
75g butter, melted

125g butter
125 caster sugar
50ml milk
150g flaked almonds
sea salt to taste

Preheat the oven to 160C/140C FAN and lightly oil and line the base of a springform cake tin.

Beat the eggs, sugar and vanilla until thick and foamy and much lighter in colour. Mix the flour and baking powder together in a separate bowl. Mix the butter and milk in a jug. Fold in 1/3 of the flour to the egg and sugar mix followed by 1/3 of the liquid in the jug. Alternate between the flour and the liquid until it has all been folded in. Pour into the prepared tin and bake for 30 minutes until risen and golden.

About 10 minutes before the cake finishes cooking start the topping. Melt the butter, sugar and milk in a saucepan, then add in the almonds, cook for 5 minutes or so until the mixture thickens slightly. Add sea salt to taste, I like salted caramel so a good teaspoon went in. 

Remove the the cake from the oven and pour over the hot praline topping. Turn the oven up to 200C/180C FAN and return the cake to the oven for a further 5-10 minutes until the topping is golden and crispy. Make sure you keep a close eye on it, it will catch quickly. 

Wednesday, 26 February 2014

Zucchini (courgette) and lemon bundt cake

Once again I am back from a week away in the Czech Republic and have subsequently gone baking mad this weekend.

First up is a simple but delicious cake, that is packed with some hidden veg! I am entering it into this months alpha bakes as the letter this month is the rather tricky z. I lived in America for a little while so I do not feel too cheeky using the American word, zucchini, instead of courgette.

The courgette adds moisture and pairs well with the zingy lemon. You could peel the courgette if you do not want flecks of green in your cake, or if you want to hide the courgette and feed it to a veg hater. I did not peel it because I was lazy and also think the green flecks are pretty.

Zuchinni and lemon bundt cake

2 medium courgettes
170g butter
3 eggs
300g caster sugar
Zest and juice of a lemon
1/2 tsp vanilla
200g self raising flour
Pinch of salt

Preheat the oven to 160C/140C FAN and grease and flour a bundt tin. 

Coarsely grate the courgette and using a clean tea towel squeeze out the water. 


Gently melt the butter over a low heat and set aside.

With a fork whisk briefly the eggs and sugar together to combine them. Again with a fork, whisk in the butter, lemon zest, a tablespoon of lemon juice, vanilla and courgette. Finally whisk in the flour and salt.

Pour into the prepared pan and bake in the preheated oven for 50 minutes until golden and springy.

Allow the cake to cool in the tin for '15 minutes before turning out onto a wire rack to cool completely.


I like this cake just as it is, no glaze or icing, a sprinkle of icing sugar was all it needed to make it smart enough for morning tea.


This cake was so good, it had people coming back for seconds. The courgette made the cake moist but not damp, and the lemon provided freshness and flavour. This is one to make again and NOT take into work!


Wednesday, 19 February 2014

Cardamom loaf cake

This just looks like a simple loaf cake from the outside but if we delve within it is packed with the exotic and aromatic flavours of cardamom and vanilla.

It is a lovely cake to enjoy with a cup of earl grey, but to be honest with any tea or coffee or even by itself this is the cake for me (for this week at least!).

Cardamom loaf cake

190g butter
170g caster sugar
The seeds from 15 cardamom pods crushed in pestle and mortar
tsp vanilla paste
3 large eggs
190g plain flour
tsp baking powder
2 tablespoons natural yoghurt 

Preheat the oven to 160C/140C FAN and grease and flour a loaf tin.

Beat the butter, sugar, cardamom and vanilla together until light and fluffy. Beat in the eggs one at a time, scrapping down the sides of the bowl in between each addition. 

Beat in the flour and baking powder until just combined before finally beating in the yoghurt. 
Tip into the prepared pan and level before baking in the oven for 50 minutes to 1 hour, until golden and a cake skewer comes out clean.

Allow to cool in the tin for a few moments before transfer to a wire rack to cool completely.


I completely forgot to take pictures of the finished loaf in my desire to eat it! It will keep in an airtight tin for a few days. The crust is AMAZING on day one! 

Wednesday, 12 February 2014

Lime and coconut cake

The second of bake from my mad weekend if baking. A simple lime and coconut loaf that came about thanks to coconut milk and limes lurking in my fridge.

The cake contains desiccated coconut, coconut milk and lime zest and I stopped with a sharp lime glaze.

Lime and coconut cake

150g butter
175g caster sugar
Zest of two limes
3 eggs
25ml coconut milk (or grams if you coconut milk is really thick)
175g self raising flour
40g desiccated coconut
Two (or more) tablespoons of coconut milk

Juice of one lime
Tablespoon if caster sugar

Preheat the oven to 180C/160C FAN and grease and the base of a loaf tin.

Beat the butter and sugar together until light and creamy thn beat in the lime zest. Beat in the 3 eggs until well combined then briefly beat in the 25ml coconut milk. Gently beat in the flour until just combined then add in the desiccated coconut, finally beat in the remaining two tablespoons of coconut milk. If your batter is very thick and you have coconut milk to spare you can add a little more here.

Pour the batter into the prepared tin and using a spatula make a gentle grove down the middle, this will help stop it rising too much in the middle.


Bake for 40-50 minutes until golden and a skewer comes out clean. Allow to cool for a few minutes in the tin whilst you make the glaze.

To make the glaze gently heat the lime juice and caster sugar in a pan until thick and syrupy.

Turn the cake out onto a wire rack and while still warm brush the top with the sticky glaze. If you like sprinkle a little desiccated coconut on the top for a pretty affect.


Mark really liked this cake but if I am being brutally honest I think I under baked it just a tad. The flavour was good but I think the texture would be greatly improved from an extra 5 minutes in the oven.

Thursday, 28 November 2013

Coconut and raspberry cake

I had been looking forward to making this coconut and raspberry cake for a while so admit to having a minor meltdown when it started to go horribly wrong...

The cakes looked good, and the raw batter was insanely delicious. Once stone cold on went the jam, so far so good. Then I made the coconut butter cream, was my recipe wrong, was it the fact I used lactofree spread instead of butter or was it that my kitchen was too warm? Who knows but the second the cakes were sandwiched together the top one started to slip and slide, there was coconut buttercream everywhere. I shoved it in the fridge muttering about wanting to throw it out of the window.

I should note that I have made buttercream many a time and have sandwiched together many a cake, the buttercream did not seem too loose. maybe the weight of the top cake was just too much?

An hour or so later and the buttercream had firmed up, I ran a palette knife around the edge and the cake was not a complete disaster. It was only for me and Mark to eat anyway, I would not have given it to anyone in that state.

The cake does taste very good and I imagine it tastes even better with slightly more filling, I guess I lost at least a 1/3.

If you like the sound of this cake please do not be put of by my mishap. Just make sure your buttercream is very very firm indeed, refrigerate it before sandwiching cakes if need be.
Leaking buttercream!!

Coconut and raspberry cake

175g butter
175g caster sugar
175g self raising flour
1 ½ tsp baking powder
3 eggs
50g desiccated coconut
30ml coconut cream

140g icing sugar
50g butter
20ml coconut cream
Raspberry jam


Preheat the oven to 180C/160C FAN. Grease 2x 20cm round cake tin and line the bases.

Beat the butter and sugar until light and creamy. Beat in the eggs one at a time. Beat in the flour and baking powder 1/3 at a time until just incorporated, do not over beat. Fold in the coconut and coconut cream.

Divide the batter between the prepared tins and smooth..

Bake for 25 minutes until golden. Loosen the edges and allow the cake to cool in the tin for 5 minutes before transferring to a wire rack and allowing to cool completely.
Beat the butter, icing sugar and coconut cream together. Sandwich the cakes together with the jam and the buttercream.