Showing posts with label bread. Show all posts

Thursday, 2 October 2014

Gluten free nutella bread

Thus is me catching up with my bake off posts. This is from last week where the contestants had to make an enriched loaf. I tweaked this challenge slightly as their loafs involved fruit and I did not want fruit, I wanted chocolate.


The recipe for the braided nutella bread comes from the delightful Gluten-Free on a Shoestring blog and the recipe can be found here.

I did have to make my own nutella as shop bought contains dairy and I will share this recipe below.

The finished load does look beautiful and is the nicest gluten free bread that I have made so far. It was perfect warm from the oven with a little extra nutella and a pot of tea for a special weekend breakfast.


Homemade nutella (Dairy and Gluten free)

100g hazelnuts (skinned)
2 tbsp good cocoa powder (I used green and blacks)
4-5 tbsp of hazelnut milk (Or use almond or soy milk if you cannot get hold of hazelnut)
1 1/2 tbs brown sugar or maple syrup
1/2 tsp vanilla paste

Blitz the hazelnuts in a food processor until they from a smooth-ish paste. Add all the other ingredients and continue to blitz until combined and as smooth as possible. Transfer to a sterile jar and keep in the fridge, eat within a couple of weeks. 

This nutella is a more grown up version, it is a little more intense, darker and not as sweet. I really like this however should you wish to make it sweeter simply add more sugar/maple syrup until it as sweet as you desire. This nutella is quite thick, add a splash more milk if you desire.

As well as the bread this nutella is great on toast topped with a sliced banana! 

Friday, 12 September 2014

Kugelhopf

So continuing along with the bake off you may have noticed I do not have a post for tarts and pies week. Well I did attempt to make a pie, I was terrified, a gluten and dairy free pastry was not an experiment I was looking forward to. The pastry I made was lovely and delicious, but it was meant to be puff pastry, something I never had problems with in the past,  and it turned out like shortcrust. I will reiterate it was lovely but I am not posting the recipe I used as it did not turn out as it should. I get to do pastry again soon though as next week is pastry week on the bake off! I show a picture of my pie to prove that I tried.


This week was the week of European cakes. The contestants had to make a European cake that was raised with yeast, a Swedish princess cake or a Hungarian dobes torte. I have never made a princess cake but I have eaten cakes consisting of sponge, jam, cream and creme pat and so I decided to go with the more interesting cake raised with yeast as I have never made/eaten one before.

I decided, like some of the contestants, to make a Kugelhopf. This is traditionally a cake raised with yeast, filled with fruit and cooked in a bundt tin. Like many of the contestants I changed my flavours, I went for cardamom, orange and almond. I also had the added challenge of making it gluten and dairy free.

I have also just remembered that this months letter for alpha bakes is K and so I will enter my Kugelhopf!


This is an experiment that worked and I am so so pleased with it, it smelt good baking, looked fantastic and also tasted great. It is very interesting, it is definitely a cross between bread and cake and those with palettes used to very sweet cakes will probably take a while to adjust. It is lovely as a plainer cake and dare I say it could even be eaten as breakfast (which I did). It does not keep so long so I have sliced it and individually wrapped slices and frozen them, I will refresh in the oven when I fancy a snack or breakfast.

Orange, cardamom and almond Kugelhopf 

380g GF flour (I used dove farm plain flour blend)
60g ground almonds
2 tsps xantham gum
Seeds of 15 cardamom pods, crushed in a pestle and mortar
120ml warm water
4 1/2 tsp active dried yeast (not instant yeast)
1/2 tsp sugar
120g DF spread (I used pure sunflower)
75g golden caster sugar
2 tsp salt
3 eggs
2 tsp almond extract
Zest and juice of an orange
2 tbsp caster sugar
a little melted butter to grease
slivered almonds to decorate (optional


Place the warm water, yeast, and ¼ teaspoon sugar together in a small bowl. Stir until yeast is dissolved. Set aside for 10-15 minutes until the yeast is foamy

Place 220g of the gluten-free flour in a freestanding large bowl or the large bowl of a large stand mixer. Add the xanthan gum and cardamom and mix to combine

In a small saucepan, heat the milk, butter, sugar, and salt. Stir until sugar is dissolved, do not let it boil.

In a medium bowl whisk  the eggs together with the almond extract and orange zest. Carefully add the milk mixture in a slow, steady stream to the eggs and whisk well. Be sure to add the milk slowly so it doesn't curdle the eggs. 

Turn the mixer on low, or using a hand held electric whisk add the milk and egg mixture in a slow steady stream to the flour mix. Raise the speed to medium and mix until smooth. Lower the speed and add the remaining flour and ground almonds. The dough should be fairly sticky and smooth, but not too stiff. Turn off mixer and let dough stand for a few minutes.

Grease a bundt pan with melted butter. if desired stick slivered almonds onto the sides of the greased pan.

 Carefully transfer the dough to the pan and smooth it evenly. Brush the top with the melted butter to prevent it drying out. 

Cover with cellophane or place in a bag and let rise for 45-60 minutes in a warm place. The dough won't have doubled, but it will have risen quite a bit.

While the dough is rising preheat the oven to GAS MARK 6 . Bake for 40-45 minutes, or until golden and baked through.

Let cool in the pan for a few minutes, then transfer to a wire rack to finish cooling.

To make a glaze put the remaining sugar and orange juice in a pan and heat gently until the sugar had dissolved, turn up the heat and reduce until the mixture is syrupy. Brush this over the cooled cake then enjoy.


Sunday, 24 August 2014

Gluten free bread rolls

Bread week on bake off, great to watch not so much fun to try and recreate. Gluten free bread has come on leaps and bounds in the supermarkets but just take a look at all the ingredients. Even recipes for 'make at home' gluten free bread have more ingredients than homemade wheat bread. I am trying to accept this but making gluten free bread still makes me miss wheat bread incredibly.

My first foray into gluten free bread was a disaster. I followed a recipe for gluten free baguettes... they were tough, tasteless and only made vaguely palatable when I toasted thin slices and smothered them with a homemade roast garlic paste and served them alongside a flavoursome fish stew.

I decided to try again and the Bake off inspired me to try rolls. Now I obviously could not make rye rolls but I decided to try making rolls with some buckwheat flour, as this has a characteristic nutty character, not too unlike rye. Buckwheat contrary to its name is not actually wheat, they are from two completely different families. Be careful when buying buckwheat flour, many say they contain gluten simply because the buckwheat is so are so contaminated during the growth and milling process.

I made my own recipe based on what I researched on-line. The recipe is in american cup measurements as much of the research I read was in american measurements.

2 cups, dove farm GF bread flour mix
1/2 cup GF buckwheat flour
1/4 cup almond flour (ground almonds)
1½ tsp. xanthan gum
2 tsp (7g) dried quick yeast
2 scant tsp brown sugar
1 tsp. salt
1 cup warm water 
2 Tbsp dairy-free margarine
1 egg (preferably room temp)
1 tsp. cider vinegar

Instructions
In a mixing bowl mix together the flours, xanthan gum, quick yeast, sugar, and salt.
With and electric mixer running on low speed, add in the water, DF spread, egg, and cider vinegar and mix on high speed 3 minutes.
Lightly oil a 8 inch springfrom cake tin  and using a ⅓ cup measuring cup, scoop the dough into 7 mounds in the pan. I placed one mound in middle, then scoop 6 mounds of dough side by side all the way around the pan.

 Dip your fingertips into warm water and use to smooth out the tops of the rolls, continuing to wet fingers as needed.

Cover with a dry towel and let rise in a warm place 45 minutes to 1 hour. During the last few minutes that the rolls are rising, preheat oven to GAS MARK 6.

Bake in  the preheated oven for 26-30 minutes until the tops are golden brown before turning out onto a wire rack to cool.

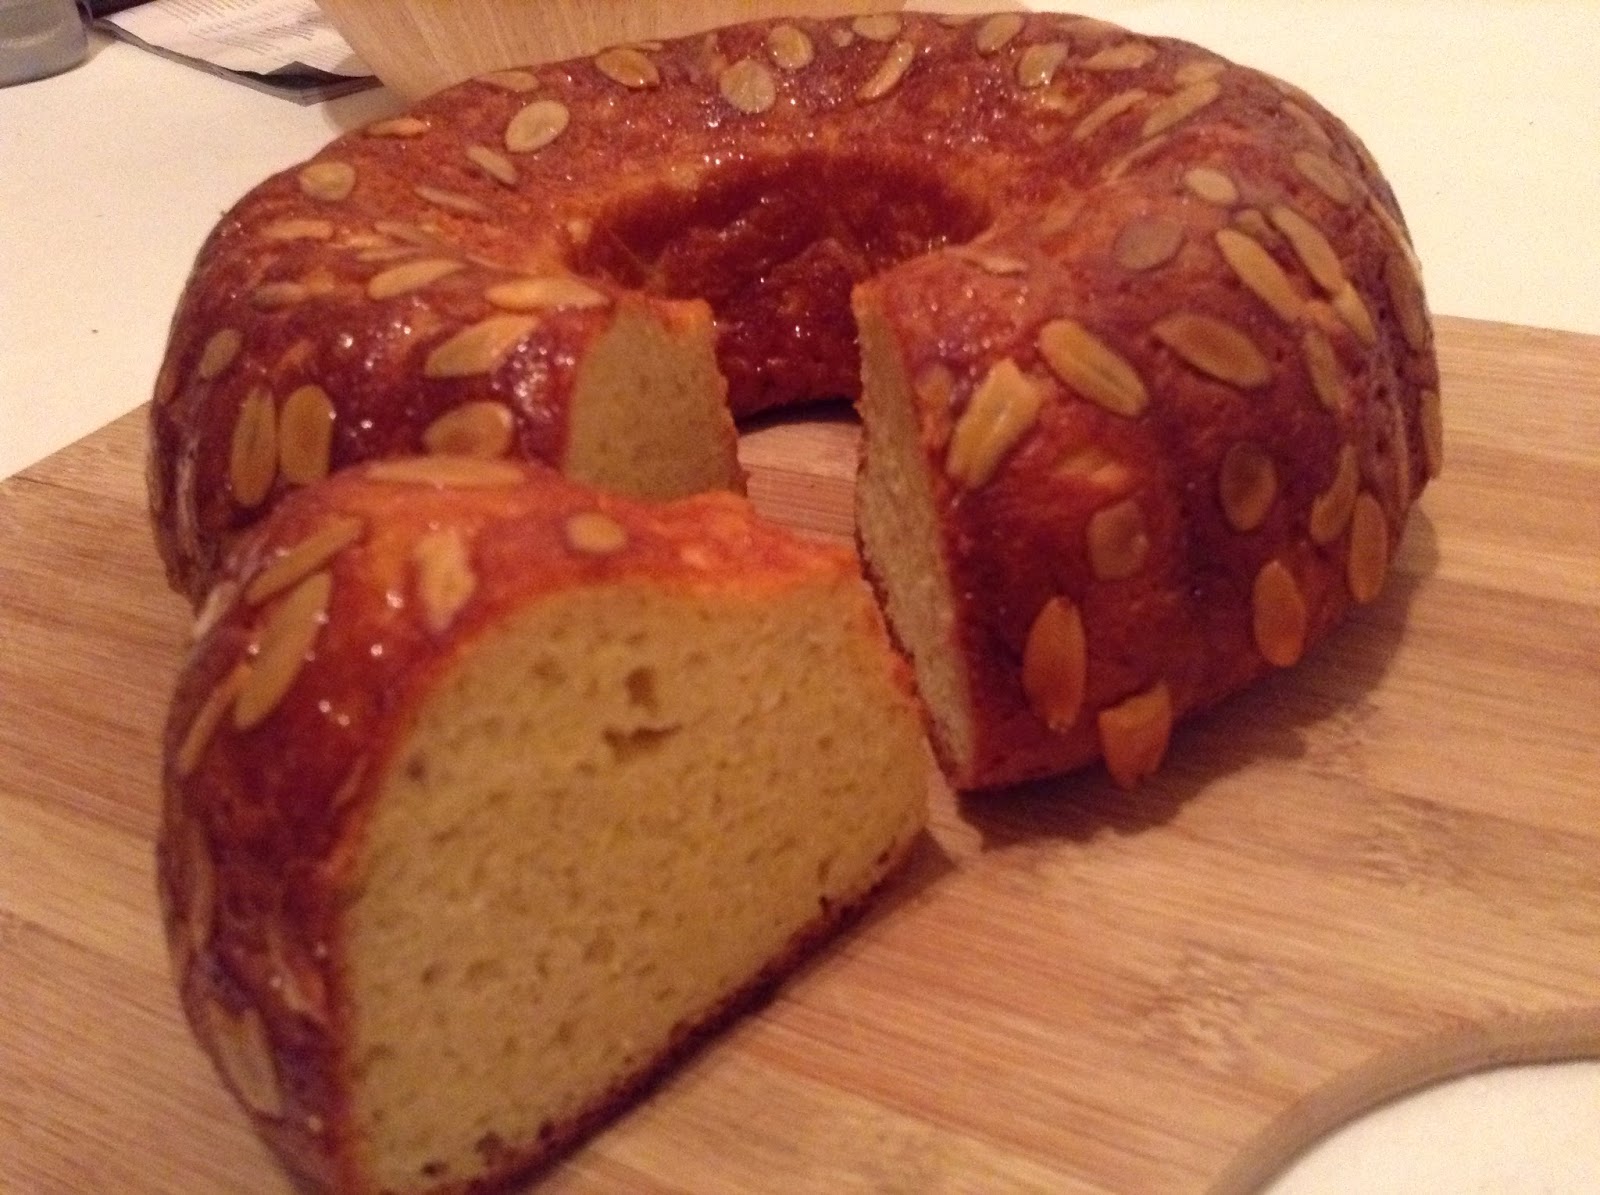
The rolls turned out much fluffier then my baguettes, in fact the crust was crusty and the inside soft and fluffy just like wheat bread. This made me very happy. I will be making these again but I will add more buckwheat flour as I did not quite feel that the amount used came through enough... I was sparing based on others saying it was really nutty in flavour, on tasting these rolls could easily take more.

I want to try finding a Gluten free bread with a few less ingredients and without the egg, not because I have anything against eggs but I think you can taste it a little and I do not really want that taste in my bread. Saying that I would prefer to use egg over artificial chemicals so I think some experimenting is in order!

Tuesday, 4 March 2014

Almond custard filled cardamom buns, Shrove Tuesday Scandinavian style!

I have a confession. It is Shrove Tuesday and I do not like pancakes.

Ok so that is not strictly true. I like fluffy home made american style pancakes packed with fruit and served with maple syrup, its a favourite weekend breakfast and you will find a number of recipes on the blog.

What I do not like is the French style crepe, which is what most households will have on pancake day. Now this throws up a conundrum. There is not time to have yummy fluffy pancakes on a weekday, and having pancakes I associate with breakfast after my evening meal feels weird and also is essentially like having two meals at once. I considered american style pancakes two ways as my actual evening meal, one with bacon and one with sweet things but was not enamoured with the idea.

It was when flicking through one of my many cookbooks that the problem was solved. Signe Johansen, author of Scandilicious baking tells us that in Scandinavia cardamom buns filled with vanilla cream and marzipan are eaten on Shrove Tuesday. In the book she offers a variation of these buns, instead of cream they are filled with an almond custard.

The almond custard are the version I have decided to make as they are much easy to adapt to be lactose free. Shrove Tuesday goodies sorted!

Almond custard filled cardamom buns (adapted from Scandilicious baking)

makes 6

80ml lactose free semi skimmed milk
15g butter
125g plain flour or white spelt flour (I used spelt)
15g caster sugar
Seeds from 5 cardamom pods, crushed with a pestle and mortar
1/2 sachet of fast action yeast
pinch of salt

100ml lactose free semi skimmed milk
Egg yolk
10g caster sugar
5g cornflour
1/2 tsp vanilla
15g blanched almonds

First up make the bun dough. Gebtly heat the butter and milk until just below boiling point, but do not bring to the boil. Set aside to cool. 

Mix the flour, sugar crushed cardamom pods, yeast and salt in a large bowl. Once the milk has cooled to room temperature add to the dry ingredients and mix until all the ingredients come together and are 'doughy'. 

At this point I placed two thirds of the dough in a lightly oiled frezer bag in the fridge to ferment overnight. I did this so we could have freshly baked buns on Shrove Tuesday. The remaining dough was placed in a lightly oiled bowl, covered with clingfilm and left to rise until doubled in size. If you prefer you could place all the dough in the fridge ready for you the next day or leave all of it to rise at room temperature if you are making them for consumption on the same day. 

While the dough is proving make the custard. In a bowl whisk together the egg yolk, caster sugar, cornflour and vanilla. Gently heat the milk until just below boiling. Add the milk a little at a time to the egg yolk mix, whisking all the time. Pour the all the custard back into the pan and, stirring all the time, heat gently until very thick. Transfer the very thick custard to a clean bowl and cover the surface of the custard directly with clingfilm to prevent a skin forming.

Roughly chop the almonds and toast them in a frying pan until they are lightly golden and smell amazing. Crush them up a bit more, I did this in a pestle and mortar then stir through the custard.

When ready to make the buns divide the dough into 6 equal pieces (if the dough has been in the fridge allow to come to room temperature). Roll into balls and place onto a lightly oiled baking sheet. Cover, leave in a warm place,  and allow the buns to prove for 15-20 minutes until they do not spring back when pressed lightly . During this time preheat the oven to 200C/180C FAN. 

Just before baking glaze the top of each bun with a little beaten egg and splash a little water in the bottom of the oven to create steam. Bake for 10-15 minutes, turning the oven down 20 degrees if the buns start to colour too much. 

The cooked buns will be golden and sound hollow when you tap them. Allow to cool completely on a wire rack then simply slice and fill with cold custard.


I can confirm that the flavour of these are absolutely delicious, the custard in particular is divine. I will update this post tomorrow and let you know if the slow prove makes any huge difference to the flavour. I suspect it will make a huge difference to the texture, I think they will be lighter.  

UPDATE: The buns left in the fridge overnight were a little lighter in texture and tasted really good.

Thursday, 26 December 2013

Stollen breakfast rolls

Merry Christmas everyone! I hop everyone's day was what they wished it would be. Are you still hungry? I suspect not. If you are like me though you will probably have a lots of leftover bits and open bags in your baking cupboard, yes? Well if so these stollen style breakfast buns could help use up the dried fruit and marzipan kicking about.

These are delicious warm from the oven and as the dough is light they are a not too heavy start to your day, plenty of room for that party buffet later!


I used the cinnamon roll recipe on my blog, here. I changed the filling by using mixed spice instead cinnnamon, plenty of mixed dried fruit and 60g of marzipan  broken into small pieces.

These really are best baked fresh so I kept the rolls in the fridge baking them over a couple of days as and when I needed them.

Thursday, 12 September 2013

Quince and Camembert flatbreads

The letter for this months alpha bakes is 'Q'. A tricky one perhaps but I knew immediately what I wanted to bake. I have had my eye on these little flatbreads for a while.

They contain quince paste, which I believe you can get all year round so no waiting for quince's to come into season.


These are a Paul Hollywood recipe and can be found here

A few notes.

1) I halved the recipe for the two of us.

2)We had some the day I made the dough, and some the next day and some the next! The dough kept really well wrapped up tight in clingfilm in the fridge.

3)Three I did no read properly and put in all the water at once. I do not think it made a blind but of difference apart from it was crazily messy to begin with.

These taste amazing, honestly they are my favourite flatbreads to date. Considering that Camembert has a pretty strong flavour I wondered if it would overpower the quince. I need not have worried the flavours balance beautifully. The texture of these flatbreads is lovely and soft, maybe because the dough is wet, maybe from melty cheese, either way it is very very  good.

Monday, 2 September 2013

White chocolate, orange and cardamom breakfast rolls

So having said I would only bake one thing from each bake off week I have already made two from bread week. I was impressed with Ruby for making a peacock out of bread, something I would never have thought of, let alone have attempted! The judges were impressed with her flavour though too and not just its looks, and I have to say I was tempted to try it myself.

So these morning rolls were conceived, as I may have mentioned I was not going to make  peacock!

The recipe can be found here, along with the instructions for making the peacock, should you wish to try.

I divided the recipe by 3 and got 6 rolls.

To the basic mix I added the zest of a whole orange, and the crushed seeds of three cardamom pods. Once I had kneaded the dough I then added 1/2 of my chopped white chocolate and briefly kneaded it in.

After the first proving I rolled the dough into a rectangle, sprinkle over the crushed seeds of 3 more cardamom pods, a tablespoon of caster sugar and the remaining white chocolate. I then rolled up the dough, cut into 6 equal buns and then set on a baking tray covered with parchment to rise for a further 30 minutes.

At this point I covered the dough and left in the fridge overnight.

To bake the rolls I heated the oven to 140C (fan) and cooked for 20-25 minutes.

They were delicious. Thank you for the idea Ruby!

Saturday, 31 August 2013

Bake along with bake off - Chilli and paprika grissini

I thought the standard on this weeks bake off was very high. No complete bread catastrophes, Lucy only went because she showed only a basic skill level as opposed to a total raw/burnt/yucky bread disaster.

From this week I decided to make bread-sticks as I have made (simple) decorated loafs and English muffins before.

I made them to go alongside a salad containing Spanish flavours so decided to make chilli and paprika grissini.


Chilli and paprika grissini 

makes ~16

155g plain white bread flour
1/2 sachet yeast (3g)
3g salt
1/2 tsp chilli powder
1/2 tsp paprika
100ml lukewarm water
1/2 tablespoon olive oil

Mix the flour, yeast salt chilli powder and paprika in a bowl. Mix the olive oil and water together and add to the dry ingredients.

Bring the mix together with your hands until a dough forms. Put a little olive oil on a work surface and knead until smooth and elastic, this takes between 5 and 10 minutes. Place the dough in a lightly oiled bowl, cover with clingfilm and leave to rise for 90 minutes.

Preheat the oven to 175C/155C FAN and line a baking sheet with baking paper

Knock the risen dough back and divide into two equal pieces (yes I did weigh mine), Lightly flour  work surface and roll out one of the dough pieces into a rectangle measuring 16cm in width and 24cm in height. 

Cut the dough into 8 even strips, using a pizza cutter or dough cutter. Fold each strip of dough in on itself and pinch, then roll into a sausage shape.
Breadstick, halfway through folding and pinching
Put on the prepared baking sheet and bake in the oven for 25-30 minutes until golden and crispy. Allow to cool on a wire rack.

So what do I think Mary and Paul would have thought? We th dough looks beautiful. The paprika and chilli give it a lovely terracotta colour and I am very proud to say all of my grissini were evenly baked!

I waited with baited breath and eager ear but need not have worried as they were very crisp and snappy! Apart from one slightly fat one in the very centre of the centre where there was a teeny tiny bit of chew. I bet that is the one Paul would have picked up!

The flavours of chilli and paprika were present giving a nice warmth without blowing your head off. Mark picked on the flavours without being told what they were, hurrah!

All in all I was proud of my grissini and think they would have stood up to the other bakers efforts.

Friday, 26 July 2013

Rosemary, honey and poppy seed bread

Rosemary is on of those herbs that I have grown to like much more as I have gotten older. That said, a careful hand is needed, the right amount brings amount a lovely fragrance and taste, too much and the whole meal is left tasting of perfume and soap!

I recall one such instance in which the university cooked carrots in what appeared to be a whole rosemary bush, I honestly did not go near rosemary for over a year.

Thankfully I am over it or this bread would never have been born.

This loaf goes fantastically well with lamb. I had it alongside a lamb salad and also for a sandwich with lamb and pesto, both were equally delicious.

Rosemary, honey and poppy seed bread

makes 1 small loaf

125g white bread flour
125g wholemeal bread flour
1 sachet yeast
15g poppy seeds
1/2 tsp salt
Sprig of rosemary, finally chopped
175ml warm water
1 tbsp honey

Mix the flours, yeast, poppy seeds, salt and rosemary together in a large bowl. Stir the honey into the warm water to dissolve it.

Slowly add the water mix to the dry ingredients and combine to form a soft dough, The dough wants to be soft but not overly sticky, you may not need all the water, I had about a tablespoon leftover.

Lightly coat a worktop with olive oil and knead the bread for 5-10 minutes until smooth and springy. Place the kneaded dough into an oiled bowl, cover with film and allow to rise for 1-2 hours.

Knock back the dough and then shape it into a small loaf, any shape you like. I had a moment of creativiy so mine ended up braided!

Place onto a baking tray and allow to rise again for ~30  minutes. Preheat the oven to 220C/200C FAN. 

After the dough has risen for a second time place it in the preheated oven and bake for 20-25 minutes until deep golden and the base sounds hollow when tapped.

Allow to cool on a wire rack and then enjoy!

This bread reminded me just how much I enjoy making and eating my own bread, the flavour is unlike that of the supermarket and the combinations are endless. 

p.s. sorry for the alarming photos, I had to take them with my phone but the camera will be back soon!

Sunday, 21 July 2013

Garlic and coriander flatbreads

I am loving this hot weather and I love cooking but combining the two is not bringing me joy, especially in my small kitchen. I also love a salad but just because it is hot does not mean that sometimes I want a little bit more.

I made these flatbreads to go alongside a greek salad, a fast and delicious super for the summer time.

Garlic and coriander flatbread

makes 4

115g white bread flour
50g wholemeal bead flour
1 tsp baking powder
1/2 tsp salt
1/2 tsp ground coriander
50g of greek yoghurt
200ml boiled water
2 cloves garlic
Tablespoon of olive oil

Crush one of the garlic cloves (either with a garlic press or use a pestle and mortar, add to the oil and set aside to infuse.

Put the flours, baking powder, salt and coriander into a bowl and briefly mix. Crush a garlic clove and add to the greek yoghurt and stir in the water.

Add the wet ingredients to the dry, a little at a time, mixing to form a dough. Knead the dough for a minute or two then leave to rest for a couple of minutes, this will make it easier to roll.

Flour a surface and roll out 1/4 of the dough a thin as possible. Heat a frying pan and add the flatbread to the pan (no oil). Cook for just over a minute on each side until browned and puffy, some flatbreads puff up alarmingly but do not worry.


 When cooked brush with the oil and store on a dinner plate covered with a clean tea towel while you cook the others.. This allows the flatbreads to steam and keeps them warm and soft.

The flatbreads are soft and full of favour, I will definitely be making again, and trying different flavour combinations. Enjoy them alongside salads, as part of a mezze or even wrapped around a burger!

I had half of the dough leftover. I wrapped it in clingfilm and stored it in the fridge until the next day when I made two more and wrapped them around homemade bean burgers and spicy relish. They were amazing but sadly no pictures as I was too busy stuffing my face and genuinely forgot!

I am going to enter these into this months alpha bakes as the letter if 'F'.

Tuesday, 4 June 2013

Olive breadsticks

Olives are the most recent transfer from my disliked food list to my liked food list. It has to be said that leaves the hated food list pretty barren. It pretty much reads tripe and wasabi.

To celebrate this move I baked with them. In a very tasty moreish olive breadstick. These would work well alongside salad, as part of a mezze platter or as a snack/appetiser with drinks.

They take a few hours to make but do not require much effort on your part. This recipe is ever so slightly adapted from Mr Paul Hollywood


Olive breadsticks

makes 8

250g white bread flour
5g instant yeast
5g salt
200ml lukewarm water
2 tsps olive oil, plus extra for greasing
125g olives, de-stoned weight

Grease a square 2L container ready for the dough. You could use a tupperware or square cake tin. 

Put the flour in a bowl and add the yeast to one side of the bowl and the salt to the other. Add ~2/3 of the water and, using a dough hook, start to mix together. When the mixture is starting to come together as a dough add the remaining water to the bowl. Continue mixing with the dough hook for 5-8 minutes until the dough is soft and stretches easily. Add the olive oil and continue to mix for a couple more minutes. Finally add in the olive and mix until evenly dispersed.

Transfer the dough to the oiled container and leave to rise until doubled in size, ~1 1/2 hours.

Line to baking sheets with baking parchment and liberally flour a work surface ad tip the risen doughy out onto it, it will be a loose flowing dough. Gently stretch/pat into an even rectangle.

Cut the dough into 8 even strips. Gently stretch till 20-25cm long and carefully transfer to the prepared baking sheets. Leave to rise for a further 1-1 1/2 hours.  

Preheat the oven to 220C/200C FAN. Bake the breadsticks for 10-15 minutes until golden. Allow to cool on a wire rack. 

These are best eaten the day they are made, they become chewy the next day, though they can be refreshed in the oven for 5 minutes.

Saturday, 11 May 2013

Baguettes

The smell of freshly made bread is, I think, truly intoxicating. Besides the smell, when you make your own bread you know exactly what goes into it.

With this in mind I decided to make baguettes. Which of course meant yet another trip to cooking shops to buy a baguette tray!
I have a number of baguette recipes and decided to first of all go for Paul Hollywood's recipe in his book 'Bread'.

The recipe was easy to follow and I ended up with lovely soft baguettes with a good crust.

I was about to type the recipe out but then realised the whole thing is here. If the link disappears I will have to return and type up the recipe but sorry to say I am feeling lazy this morning!

I had the baguettes with John Whaite's 'Lone wolf baked eggs', in a word? Delicious.


Wednesday, 17 April 2013

Chorizo, mozzarella and rocket rolls

I have really been enjoying the repeats of The Great British Bake Off on BBC. I download them, as I am at work, then spend a good few hours on the sofa armed with plenty of cake watching the re-runs.

It was especially fun watching series one as I had missed this first time round. I thought the bread rolls that Edd made looked delicious and by a wonderful coincidence they appeared on his blog a day later!

I copied his recipe word for word, it can be found here.

They were delicious the day they were made and just as fabulous a day later refreshed for a few minutes in the oven .

I do bake bread on a regular basis but these have certainly inspired me to experiment with some filled rolls of my own.

Friday, 12 April 2013

Garlic and chilli ficelles

What is a ficelle? Erm will my French is non existent so I am going to go with a kind of soft breadstick.

Whatever it is it is extremely tasty alongside soup, salad, your evening meal or as a nibble with a glass of wine. Yes, I tried all these combinations!

The recipe is adapted from Paul Hollyood. His involved truffle, I do not have truffle oil! Not yet anyway...

Garlic and chilli ficelles

250g white bread flour
packet of fast action yeast
tsp salt
200ml tepid water
garlic clove
2 tbsps chilli oil
dried oregano 

You will need a dough hook for this recipe. Either attached to a free stading mixer or as part of a hand held whisk. Put the flour, yeast and salt into a large bowl. Add ~2/3 of the water and using the dough hook mix slowly until a dough starts to come together. 

Add in the remaining water and continue to mix for at least 5 minutes, the dough should be smooth and stretchy. 

Either crush the garlic clove or finely grate it and add to the bowl along with 1 tablespoon of the olive oil. Mix for a further two minutes.

Oil a 2 litre rectangular container, I used a Tupperware, and transfer the dough. Leave in a warm place until doubled in size (mine took ~1 hour)

Flour a work surface well and tip the dough out. Do not knock it back, you want to keep as much of the air as possible. Gently stretch into an even rectangle.

Cut into 8 equal strips, then gently stretch each strip to ~25cm long. Be careful the dough is very soft and delicate.

Lay each ficelle onto a baking sheet, you will need two, lined with baking parchment. Use your finger to make a few indentations along the length of each one. Leave in a warm place until risen again. I left mine 1/2 hour. 

Preheat the oven to 220C/200C FAN. Brush each ficelle with the remaining chilli oil and sprinkle with a little dried oregano. Bake in the oven for 10-15 minutes until golden.

These are wonderful warm from the oven. Paul says they are best eaten within 24 hours and I agree. I made them one evening and refreshed them through in the oven before having leftovers the following lunchtime.

Monday, 25 March 2013

English muffins

I am not a huge bread snob. I am not a fan of the sliced stuff but I do buy some types of bread, I simply do not always have the time, or the inclination to make it myself.

When I do buy bread it tends to be from local bakers so less chance of absolute rubbish. Bread can be so delicious but disappointing bread is really really disappointing!

After a week of being ill I wanted something nice for a Saturday brunch and decided on English muffins with scrambled eggs and smoked salmon.

Still not feeling well I was going to buy the muffins, I had a quick nosey at the ingredient list and this is what I saw.

Wheat flour, water, yeast, maize, rice flour, salt, sugar, wheat gluten, vegetable oil, soya flour, emulsifier E472a, E471, Preservatives Calcium Propionate, E200, Acidity Regulator Tataric Acid, Flour Treatments Ascotrbic Acid (Vitamin C)

This seemed a lot of ingredients for a simple breakfast muffin. So I looked it up. This is what is in a homemade one.

Bread flour, water, milk, yeast, sugar, salt.

I do understand to make it to our shelves food needs certain preservatives but 3 times the amount of ingredients really put me off. So I dragged myself into the kitchen and actually these are really very very easy to make.


English muffins

makes 6

115ml milk
1 tsp dried yeast
1/2 tsp caster sugar
220g white bread flour
1/2 tsp salt

Gently warm the milk with 25ml water until warmed through. Do not heat it too much, you do not want to kill the yeast. If it does get a little too warm, leave to cool before adding to the yeast. 

Add the warm liquid to the yeast and sugar, whisk and leave for 10 minutes until frothy.

Mix the flour and salt then add in the frothy, yeasty liquid. You want a soft, not sticky, dough. You may not need all the liquid, or if your dough is really too sticky add a touch more flour.

Knead the dough for 10 minutes until smooth and pliable. Put in a bowl, cover and leave in a warm place, until doubled in size. Mine took ~ 1 hour.

Take the dough and, on a lightly floured surface, roll out to about 1 cm thick. Use a cutter 7-8cm in diameter to stamp out rounds. The trimmings can be squished back together, re-rolled and more muffins stamped out.

Pop the muffins on a lightly floured baking sheet and leave in a warm place for ~ 1 hour to rise and puff up.

Melt a little butter or lard in a heavy based frying pan and pop in your muffins. Turn the heat down to low and cook the muffins for 6 minutes on each side. You will probably need to cook the muffins in a couple of batches.


I made these on Friday afternoon and on Saturday split and toasted them for brunch. They tasted fab as part of brunch. I imagine they are lovely warm and fresh but I cannot say for sure.. I will have to make them again to be sure.

Sorry for the lack of pictures, I was really not with it when I made these!


Tuesday, 15 January 2013

Wheaten bread

My boyfriend is Northern Irish and absolutely adores wheaten bread. For the uninitiated this is a wholemeal soda bread, soda bread uses no yeast and relies on bicarbonate of soda and buttermilk for its texture. To be honest its not my favourite bread, though I do like it toasted. Still it takes literally seconds to whip up and lasts well in a tin so I don't mind making it on a pretty regular basis, just for him.

Wheaten bread

makes 1 large loaf

300g wholemeal bread flour
100g white bread flour
tsp salt
tsp bicarbonate of soda
60g butter
300ml buttermilk

Preheat the oven to 200C/180C FAN. Mix the flours, salt and bicarbonate of soda together in a large bowl. Rub in the butter, with your fingertips, until the mix resembles breadcrumbs. Stir in the buttermilk then bring together with your hands. You may need a little extra milk, I use regular milk to 'rinse' out the buttermilk pot and add that until the dough comes together.

Shape the dough into a round and place onto a baking tray. If you wish brush the top with milk and sprinkle on a few oats. Press a knife deep into the dough to create four farls (wedges). 

Bake in a preheated oven for 30-40 minutes until fully cooked, it should sound hollow when tapped underneath.

Allow to fully cool on a wire rack and then store in an airtight container.