Showing posts with label tart. Show all posts

Saturday, 6 April 2013

Apricot frangipane tart

This is the second of two desserts that I created for Easter weekend. Coincidently the letter for this months alpha bakes was announced a day later, it is 'A'. So I going to enter my tart with 'A' being for apricot and almond.

I knew I would like this tart, but I was not aware just how much! I am looking forward to trying different combinations of fruit and frangipane as different fruit comes into season.

Short buttery pastry, soft frangipane and juicy fruit. What's not to love?


Apricot and frangipane tart

for the pastry

85g cold butter, cubed.
175g plain flour
1 tablespoon caster sugar
2 egg yolks

For the frangipane

140g butter
100g caster sugar
2 eggs
140g ground almonds
50g plain flour

tin of apricot halves

First make the pastry. Rub the butter and flour together until they ressemble breadcrumbs then stir through the sugar. Add the egg yolks and two tablespoons of ice cold water and use a knife to cut through the mixture until it starts to come together. Use your hands to bring al the dough together as one. You may need to add a little more water depending on the size of your egg yolks.

Wrap the pastry in clingfilm and refrigerate for 30 minutes. Alternatively refrigerate overnight and remove from the fridge and hour before you wish to use it.

Preheat the oven to 200C/180C FAN. Dust a work surface with flour and roll out the pastry and line a 23cm tart tin. I used my long one from lakeland (36cm in length) which worked very well. Trim the excess pastry, prick the base with a fork, line with baking paper and fill with baking beans, or rice. Bake for 10 minutes then remove the baking beans and paper. Bake for a further 10-15 minutes until golden and biscuity.

To make the filling cream the butter and sugar together until light and creamy then beat in the eggs. Finally fold in the ground almonds and flour.

Spoon the frangipane filling into the pastry case and level the top. Place the apricot halves on top, in whatever pattern you desire.

Bake the tart for 30-35 minutes until cooked and golden. 

Leave to cool in the tin for ~20 minutes and when the tin is cool enough to handle remove the tart and allow to cool.
Two mugs assist in removing the sides of my loose bottomed tin!
This tart can be served slightly warm or at room temperature. I served it with a vanilla chantilly cream which complemented the tart perfectly.

It was also lovely the second day slightly warmed through in the oven. All in all a resounding success.

Sunday, 24 February 2013

French rhubarb tart

This is a very elegant dessert that does require a little more effort on your part. Its probably not one you would just knock up for a normal weekend dessert. Saying that I do urge you to try it before forced rhubarb is out of season, as it looks, and more importantly tastes, absolutely stunning.

Its a bbc good food magazine recipe but I have tweaked it just a little to suit my own tastes. For example I love rhubarb and all the tartness that comes with it and so I have reduced the sugar that it is poached in.

You will need a special long fluted tart tin with a loose bottom. I got mine from lakeland, it will be useful for lots of other tarts, both sweet and savoury.

French rhubarb tart

500g forced rhubarb
25g caster sugar
juice of half a lemon

250g plain flour
1 tbsp icing sugar
140g cubed butter
1 large egg yolk

250ml milk (whole or semi skimmed)
Seeds from one vanilla pod
4 large egg yolks
2 tbsp caster sugar
1 tbsp cornflour
1 tbsp plain flour
60ml double cream

Cut the rhubarb into batons, each 10cm in length. You will need enough to go along the length of the tart tin plus at least one extra. Put the sugar, lemon juice and 250ml of water into a wide frying pan, add the rhubarb and simmer for 5 minutes. Leave the rhubarb to cool in the syrup for at least 1 hour or overnight.

For the pastry put the flour, sugar and butter into a food processor and blitz until the mixture resembles breadcrumbs. With the motor running add the egg yolk and enough ice cold water for the mixture to come together. Tip onto a work surface and bring together with your hands. Wrap in clingfilm and chill for 30 minutes.

For the crème patisserie gently heat the milk and vanilla seeds until just below boiling. In the meantime mix the egg yolks, sugar and flours together until combined. Add a little of the hot milk to the egg mixture whisking constantly, gradually add the remaining hot milk continuing to whisk. Return the liquid to the pan and set over a lowish heat, stir continuously until the mixture thickens to the consistency of very very thick custard. This will take time, do not be tempted to turn up the heat.

Using a spatula transfer the crème patisserie to a clean bowl and cover the surface with clingfilm to prevent a skin forming. Chill for at least 1 hour or overnight.

Remove the pastry from the fridge and, on a lightly floured surface, roll out into a rectangle, bigger than your tin, 1mm thick. Line you tin, making sure the pastry gets into all the corners. Leave any overhang for the time being.

 The pastry is very short and it may crack a little as you line the tin, if so use a little of the little extra overhang to do a patch job. I had to do this in two corners and it turned out completely fine.
Trying to show my patchwork job
Chill the lined tin for 30 minutes. Preheat the oven to 200C/180C FAN. Line the tart with baking paper and baking beans (or rice etc) and blind bake for 20 minutes. Some of my overhang fell off after blind baking, nothing to worry about. Remove the baking baking and beans and continue to bake for another 8 minutes until golden in colour. Remove excess pastry with a sharp serrated knife and leave to cool in the tin.

Remove the rhubarb pieces from the syrup and set aside. Heat the remaining syrup until it has reduced in volume and is a thick sticky syrup.

Beat the cream until it holds soft peaks and then beat a little of this into your chilled crème patisserie. Fold the remaining cream through until no streaks of cream remain.
Ready to assemble

To assemble the tart. Remove the pastry tart form its case and place on a plate/board. Fill with the crème patisserie and smooth over the surface.

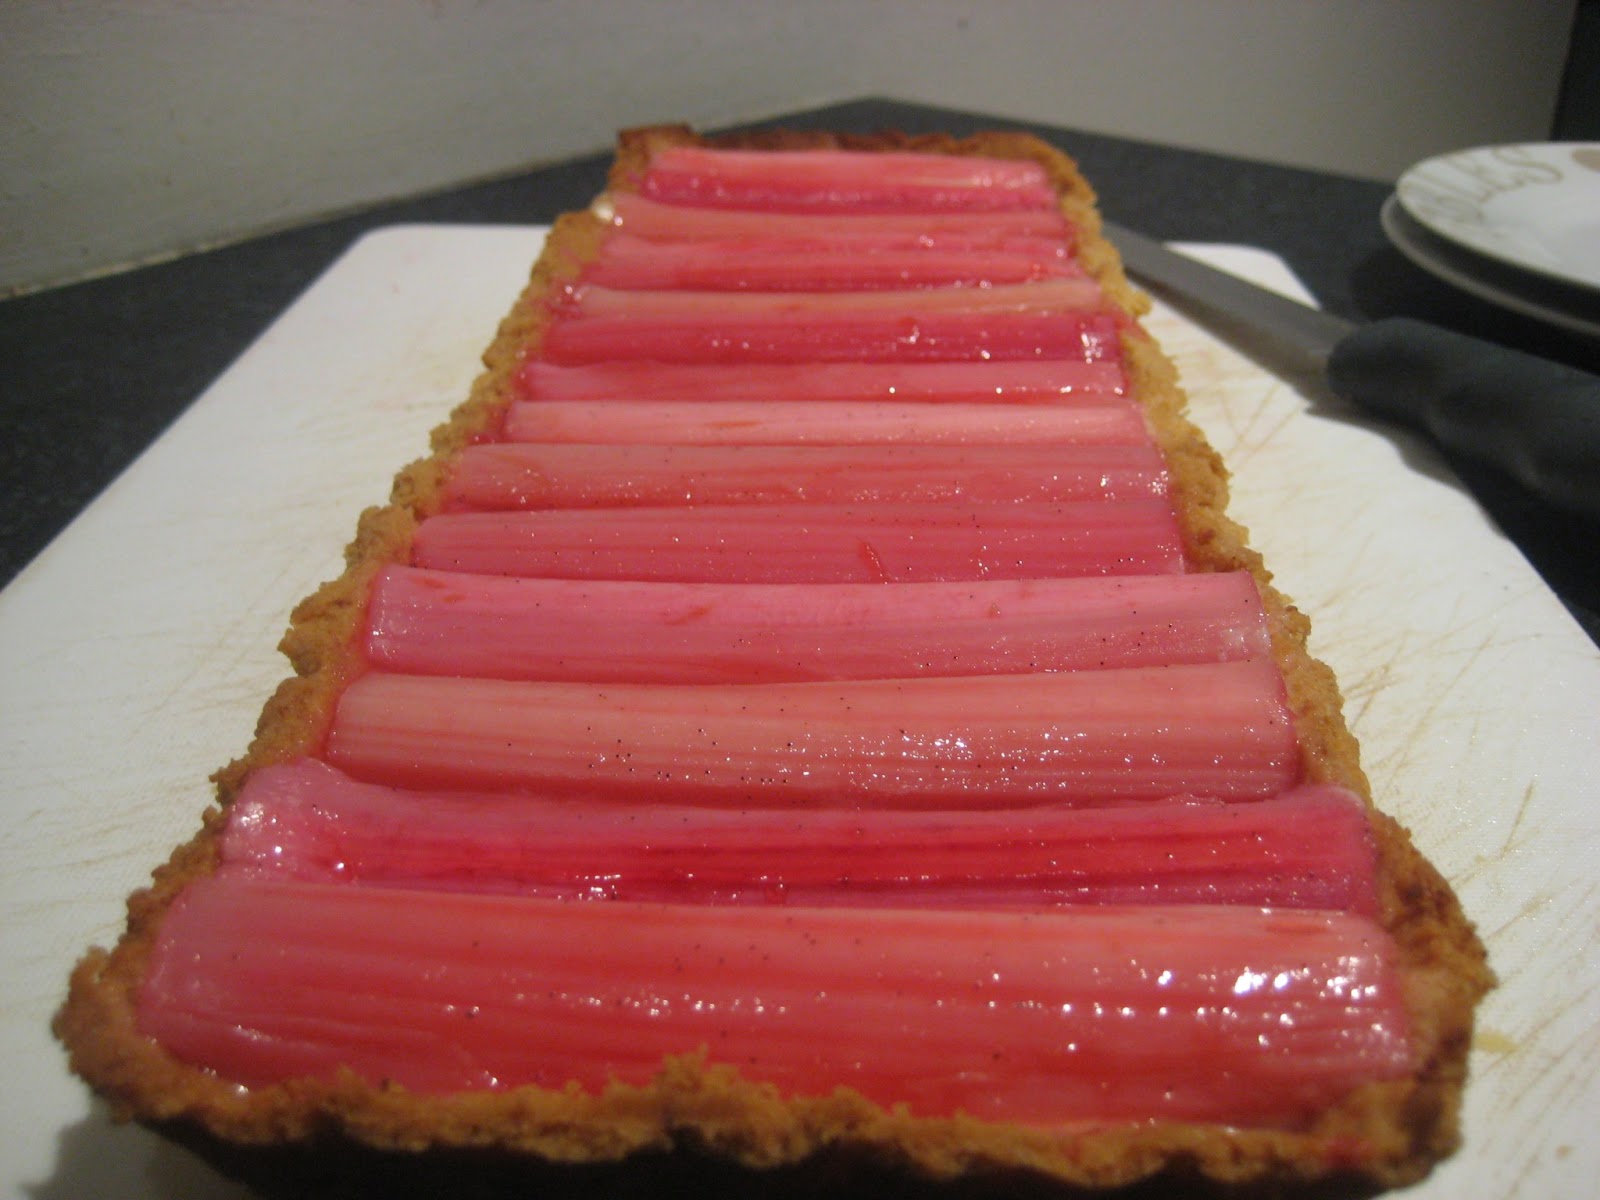
 Line the rhubarb up along the length of the tart.

 To finish glaze the rhubarb with some of the syrup. Chill the tart for 30 minutes before serving. To serve use a sharp serrated knife to cut slices from the tart.

This tart was absolutely lovely and the perfect dessert for a special meal. It kept well in the fridge and was lovely the next day too. BBC said it would keep for up to 3 days but I suspect it is better much sooner.

The only downside is I now have 5 egg whites. I sense some macarons may be made very soon...

Sunday, 27 January 2013

Chocolate and salted caramel tart

Yesterday I went on a 'Cooking with Chocolate, day at the Edinburgh new town cookery school. It was a fantastic day and I would recommend their Saturday workshops to everyone.

During the day we made sirloin steak with a port and chocolate sauce, chicken mole (chicken in a chilli and chocolate sauce), marbled chocolate cheesecake, brownies and a chocolate and salted caramel tart.

The chicken mole was delicious and it will certainly be made again in my house. The cheesecake and tart were also amazing. Today I will share the tart recipe with you and the cheesecake will make an appearance soon.


Chocolate and salted caramel tart

makes 3-4 individual tarts

For the pastry 

115g plain flour
1 tbsp caster sugar
1 tbsp cocoa powder
50g butter, cubed
1 egg yolk
1 tbsp cold water
1/2 tsp vanilla extract

For the caramel

125g sugar
1/4 tsp cream of tartar
60g butter, cubed
50ml double cream
sea salt to taste

For the chocolate layer

1 tbsp sugar
1 small egg
50g plain chocolate
35g butter, cubed

To make the pastry, put the flour, sugar and cocoa in a processor, add the butter and whiz until the mixture resembles breadcrumbs. Add the egg yolk, water and vanilla and whiz until the dough almost comes together, Tip into a bowl and bring together with your hands. Shape into 3-4 discs, wrap into clingfilm and chill for 30 minutes. 

Meanwhile make the caramel. Dissolve the sugar and and cream of tartar with 21/2 tbsp of water in a saucepan. Do not let it boil until the sugar is dissolved. Once the sugar s fully dissolved bring to the boil and add in the butter. Keep boiling until the mixture is a golden toffee colour. Be patient this whole process can take up to 20 minutes. Remove from the heat and stir in  1/2 the cream, once the bubble subside add the remaining cream. Add a good pinch of sea salt and leave to cool. 

Lightly flour a work surface and roll out the pastry discs fairly thinly and line your tart cases. Chill for 30 minutes. Put the oven on to preheat at 200C/180C FAN. 

Prick the base of the pastry case with a fork and line with baking parchment and baking beans. Bake for 12 minutes, removing the baking parchment and beans for the last couple of minutes. Set aside to cool. 

Turn the oven down to 170C/150C FAN. 

To make the chocolate layer gently melt the butter and chocolate together. Beat the egg and sugar together until thick and pale custard coloured. Pour the chocolate mixture over the egg mixture and bat together until smooth and glossy.

Spread the caramel over the base of the tartlets (if the caramel is too hard it can be warmed VERY gently) and spoon the chocolate layer over the top. Bake for 12 minutes until set then leave to cool in the tin.

Once cool remove from the tin and devour!

These are very richly and simply delicious. The individual tarts we made on the day were in my eyes very big. One easily served the two of us. A little ice cream on the side was a good accompaniment to cut through the sticky caramel.

Monday, 28 May 2012

Chocolate and raspberry tart

This weekend I went on a patisserie course, a whole day of pastry making! I had pastry for lunch and brought home sooo much of the stuff. Thankfully pastry does keep in the fridge/freezer so I do not have to attempt to eat it all and fall into a pastry induced coma.

Saying that one of the things that I made was a chocolate and raspberry tart with pate sucree pastry as the case.

This does have to be eaten soon after making, and trust me this is no hardship. This tart is beyond delicious. A sweet pastry base, encasing tart raspberries and a smooth rich chocolate ganache. One word. Yum. It is originally a Michael Roux recipe I think.


Sorry I do not have pictures of the process, I was not able to take them on the day. I will describe the process the best I can and when I next make this pastry I will add pictures.

Chocolate and Raspberry tart


For the pate sucree


110g plain flour
pinch of salt
55g unsalted butter, softened and cut into cubes
55g sugar
2 egg yolks
tsp vanilla paste


For the filling


250g raspberries
250ml whipping cream
200g good quality dark chocolate (60-70% cocoa solids)
25g liquid glucose
50g butter, cut into small pieces


First make the pastry. Sift the flour with the salt on to the work surface. Make a huge well in the centre. There wants to be no flour at all in this well. Put the butter in the well, place the sugar, egg yolks and vanilla paste onto the butter.


Using the fingertips of one hand, mix the butter, yolks and sugar together until it is well mixed and looks a little like scrambled eggs. Do not get flour in the mix just yet. The best way I can describe the mixing of this is to imagine that your fingertips are a hen and you are 'pecking' the butter etc.


When you have a nice smooth mixture flick the flour over the butter using a palette knife. Use the side of the palette knife to cut the mixture, as if you were chopping herbs,when the mix is uniformly yellow bring together into a rough ball, still on the work surface, then use the palette knife to smear a little of the mixture away from you. Keep smearing the mixture along the work surface until it has all been smeared to a smooth paste. 


Wrap the pastry in clingfilm and chill for 30 minutes. 


Preheat the oven to 190C/170C FAN. Roll out the pastry to a round ~2mm thick and use to line a lightly greased 20cm flan ring (2.5cm deep) or a loose bottomed tart tin, you could also uses individual tart tins. The most important thing is that the sides need to be quite high to encase the filling.


When lining the tin ease in the pastry and press lightly into the corners, do not pull or stretch, this could cause the pastry to shrink. Before baking trim the pastry and then pinch the pastry so that it sits just above the tin, this should help prevent shrinkage.


Prick the base of the pastry case and blind bake it for 20 minutes. Lower the oven by 10C, remove the beans and paper and bake the case for another 5 minutes.


Leave to cool for 1 minute then remove from the tin and leave the pastry case to cool completely on a wire rack.


Once the case is cool half enough of the raspberries to cover the base of the pastry case.


Bring the cream to the boil over a medium heat. Take the cream off the heat and add the chocolate and liquid glucose, and mix with a whisk to a very smooth cream (note just mix with the whisk, do not beat, you do not want bubbles). Keep mixing and add the butter a piece at a time until it is all incorporated. 


Pout the ganache over the raspberries to fill the pastry case. Set aside to chill in the fridge for at least two hours before serving.


Use a knife dipped in hot water and dried to slice the tart. Serve the tart with the reserved raspberries that are left. ENJOY!