Showing posts with label vanilla. Show all posts

Saturday, 14 February 2015

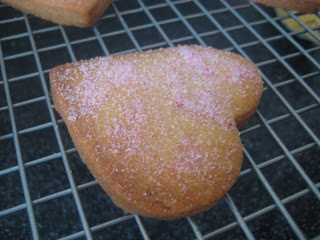
Valentine shortbreads (gluten free, lactose free)

If truth be told my fiancé and I do not like the commercialism of valentines day, I can think of nothing more awkward than being in a restaurant on valentines evening. I would not say I am anti valentines, I believe in showing someone you love them, I just don't think I need a set time and day to do that, and nor do I need people cashing in on our love. Still I know many people love it, each to their own, and if it makes you happy that's fabulous.

I made these biscuits however for two reasons. One I won a bake off at work and one of my prizes was this cute letter stamp set from Lakeland. With valentines a few days away I decided shortbread lovehearts could be quite cute. Secondly the letter for this months alpha bakes is V. So that was sorted, a Valentines bake.


Oh there is a third reason to make these, they are yummy. Vanilla shortbread sandwiched with lemon or chocolate buttercream. As you know if you handle regular shortbread to much it becomes tough, this is the caused by the gluten in the flour, The best thing about using gluten free flour is that the gluten is not there, which means that you can re-roll the scraps of this dough until they are all used up and no tough biscuits occur. Actually they are fantastically short, I think they are better than shortbread I made with wheat flour, hurrah! I have used lactose free butter for that buttery taste, If anyone uses a completely dairy free spread to make shortbread I would love to know how they turn out.

You could make these biscuits in any shape you like, not just hearts, and you do not have to stamp them if you do not have stamps, they will still taste delicious.


Vanilla shortbread 

200g lactose free spread
100g caster sugar
tsp vanilla extract/paste
275g GF plain flour
1/2 tsp xantham gum

For the buttercream

50g lactose free spread
150g icing sugar
splash of diary free milk if needed
Tablespoon of cocoa powder
zest of a lemon


Beat the spread, sugar and vanilla paste together until combined and creamy, then fold in the the flour ans xantham gum. It will initially look like you have way too much flour but be patient all will be fine. Wrap the dough in clingfilm and refrigerate for 30 minutes.

Line the baking sheets with baking parchment. Roll out the dough between two sheets of clingfilm until 5mm thick, stamp out shapes of your choosing and transfer them to the parchment lined baking sheet. Transfer the baking trays to the fridge for 15 minutes. While the cut out biscuits are chilling preheat the oven to 180C/160C FAN/ gas mark 4.

Bake the biscuits for 20 minutes until lightly golden. Leave to cool briefly on the baking sheet before transferring to a wire rack to cool completely.


To make the buttercream beat the sugar and spread together until light and creamy, if it need a little help to come together add the tiniest splash of dairy free milk. I then split the buttercream in half. To one half I added the lemon zest and to the other I added the cocoa powder which I had made into a paste with a tablespoon of boiling water.

Once the biscuits are cool sandwich together with the buttercream. I only sandwich a few together at a time. I keep the unsandwiched biscuits in the tin and the buttercream covered in the fridge. I then sandwich biscuits as and when I need them. This way the biscuits stay beautifully crisp.

Monday, 26 January 2015

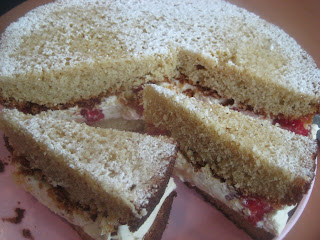
Lemon Victoria Sponge

January seems to go on forever doesn't it? Its still cold and dark but without the sparkle of Christmas lights in December and pay day seems ages away, for me personally when I get paid on Wednesday it will have been 40 full days since I was last paid. This sunshine like cake is enough to brighten the dark poor days and reminds us that spring IS on the way.

If you do not need to follow a special diet you can use butter, dairy cream, any lemon curd and wheat flour, simply omit the xantham gum. 


I will enter this cake for alpha bakes as the letter this month is L.


Lemon victoria sponge

3 eggs, weighed with shells, room temperature
Same weight of dairy free spread
Same weight of sugar
Same weight of GF plain flour
1 tsp baking powder
1/2 tsp xatham gum
Tsp vanilla paste
zest lemonLemon curd (I made my own, so it was dairy free)
Dairy free cream
Grease and line the base of two 20cm cake tins, if like me you do not have two tins then make the cakes in batches. Preheat the oven to 180C/160C FAN/GAS MARK 4.

Beat the butter and sugar together until light and fluffy then beat in the vanilla, lemon zest and eggs for a further minute. Add the flour, baking powder and xantham gum and beat until just combined. Do not overbeat.

Divide the mixture equally between the tins and bake for. 20-25 mutes until golden and springy.

Leave to cool in the tin for 5 minutes before turning out onto a wire rack to cool completely.

Once cold sandwich the cakes together with whipped dairy free cream of your choice and plenty of lemon curd.


Thursday, 6 March 2014

Dairy free victoria sponge

In this instance I mean dairy as all milk products, not eggs. Victoria sponge is a classic and one of Mark's favourites, though I must say I am partial to a slice or two myself.

Strawberry and champagne jam was on offer and so I snapped it up and set about making a cake. Mary Berry readily admits to using baking spread instead of butter in her cakes so I was less worried about spurning the butter! I used a 'Pure' soya spread with no nasty additions. Its not that I will not have butter, its that I cannot, I think natural butter is indeed a wonderful thing and I did not want to swap it for fake rubbish.

As well as jam in the middle I added whipped coconut cream spiked with plenty of vanilla. The coconut cream gave a creaminess and was an excellent substitute for double cream, an added bonus is that is is also better for you!


Dairy free victoria sponge

3 eggs, weighed with shells, room temperature
Same weight of butter
Same weight of sugar
Same weight of plain flour
Tsp baking powder
Tsp vanilla paste
Jam of your choice
Can of coconut cream, make sure it is cream not milk

Grease and line the base of three 20cm cake tins, if like me you do not have three make the cakes in batches. Preheat the oven to 160C/140C FAN.

Beat the butter and sugar together until light and fluffy then beat in the vanilla and eggs for a further minute. Add the flour and baking powder and beat until just combined. Do not overbeat

Divide the mixture equally between the tins and bake for. 20-25 mutes until golden and springy.

Leave to cool in the tins for 15 minutes then transfer to a wire rack to cool completely.

Once the cakes are cool sandwich them together with plenty of strawberry jam and coconut cream.

This cake was just beautiful. Light without being dry, it had a substantial cake crumb, it was everything a sponge cake should be. The flavours of vanilla and strawberry are a classic and the champagne in the jam just lifted it to extra special.

Wednesday, 8 January 2014

Butterfly buns

I have a leaky roof and an  unhabitable bedroom, I also have a cold, and its raining. With this in mind I wanted to bake but something very very simple, not tasking and not requiring any ingredients not currently residing in my house.

I was flickiing through my new Mary Berry book and there they were, butterfly buns, the cakes of my childhood. And I felt like being a child just then so these were the perfect choice. 

I did swirl some rhubarb and ginger jam through the vanilla buttercream, mainly for prettiness but it does actually add a nice zing. This is purely an optional twist, you may want to keep your butterfly buns the pure vanilla goodies you remember from your youth.


Butterfly buns

makes 12

100g butter
100g golden caster sugar
1/2 tsp vanilla paste
2 medium eggs
100g plain flour
1 tsp baking powder
1 tbsp milk

30g butter
100g icing sugar
1/2 tsp vanilla paste
tablespoon milk
1 tbsp jam, to swirl (optional)

Line a cupcake tin with liners and preheat the oven to 190C/170C FAN. 

Beat the butter and sugar under light and fluffy. Beat in the vanilla and egg until thoroughly combined. Beat in the flour and baking powder until just combined then finally neat in the milk.

Divide the batter evenly between the cases and bake for 15-20 minutes until golden and springy. Make sure you check after 15 minutes, mine were done then.

Transfer the cakes to a wire rack to cool. To make the buttercream beat the butter, icing sugar, vanilla and milk together until light and fluffy. If using the jam take a tablespoon and lightly swirl it through the buttercream using a spatula (or spoon)

When the cakes are completely cold cut a round from the top of the cakes. It does not have to be too big. Divide the buttercream between the cavities you have made in the buns. 

Cut the excised piece in half and insert into the buttercream to look like butterfly wings.

Sometimes the simple things are the best, a butterfly bun is a delicious treat (its really just a precursor to the cupcake), full of memories. Yum.  


Monday, 26 August 2013

Bake along with bake off - Victoria sponge

Apologies for the lack of posts of late, I had a couple of epic disasters (who forgets to put fat in a cake?!) then went away.

I am back now and hope that all baking disasters are firmly behind me, especially as I had the idea of baking along with The Great British Bake Off each week.I will only be doing one of the challenges each week, not the signature, technical and showstopper, I do not think my waistline would thank me for that!

The first week was cake and so I decided to do my signature victoria sponge. As Mary said she wanted no plain and boring jam sponges, I made mine a lemon and raspberry victoria sponge. It is a lemon and vanilla sponge filled with lemon curd, raspberries and vanilla chantilly cream.


Lemon and raspberry victoria sponge

3 eggs, weighed with shells, room temperature
Same weight of butter
Same weight of sugar
Same weight of self raising flour
Tsp vanilla paste
zest of lemon
Tsp baking powder

Lemon curd
Raspberries
Single cream
1/2 tsp vanilla paste

Grease and line the base of two 20cm loose bottomed cake tins. Preheat the oven to 160C/140C FAN.

Beat the butter and sugar together until light and fluffy then beat in the vanilla, lemon zest and eggs for a further minute. Add the flour and baking powder and beat until just combined. Do not overbeat

Divide the mixture equally between the tins and bake for. 25-30 mutes until golden and springy.

Leave to cool in the tins for 15 minutes then transfer to a wire rack to cool completely.

Once the cakes are cool sandwich them together with plenty of lemon curd, vanilla cream and fresh raspberries.


Confession time. This cake tastes absolutely beautiful, I urge you to try it but there were a couple of niggles, these would hopefully not have seen me kicked off the bake off but I certainly would not be winning star baker!

Firstly in true bake off style I dropped my cake. Not onto the floor but a couple of inches onto the worktop, while it was still in the tin. My beautiful risen cake now had a little dip in it. I simply turned it over hoping the filling would hide it...

Secondly I have a super hot oven and have accepted that the edges of my cake will brown. I know Paul and Mary are not fans of this, who was it who grated off their dark edges last year?
Dark edges!
All said this was a yummy cake and I am 100% happy with my efforts!

Bread next week, always and interesting one!


Friday, 28 June 2013

Healthy (ish) creme brulee

I adore creme brulee, if I see it on a restaurant menu is is always a strong contender for dessert. It is not something I make at home as I do see it as a once in a while indulgent treat.

However this months good food magazine contained a recipe for a healthy creme brulee. I was a little suspicious initially but then I read the ingredients and realised it still contained cream and eggs so was some weird pretend creme brulee.

It uses milk and single cream instead of double, uses cornflour as well as eggs to help thicken it and adds some half fat creme fraiche. The main difference is that this brulee is cooked entirely on the stove top, there is no baking in the oven

My curiosity was aroused and so I decided to try it, nothing ventured nothing gained!

I followed the recipe exactly, I know it will be online in just a couple of days so I will add the link then.

This creme brulee was lovely. The caramelised sugar topping was just like your normal creme brulee and it gave way to a lovely thick vanilla custard. The creme fraiche added a slight sharpness which I actually really liked.

All in this is a lovely creme brulee, and as it is substantially healthier than the regular version it can be worked into my life a lot more which, when it comes to creme brulee, can only be a good thing.

Friday, 31 May 2013

Victoria sponge

Ever have a day where you bake something that is not especially complicated, perhaps something you have made many a time before, and it is much more fantastic than usual? More fantastic perhaps than the effort put in?

I was asked for a victoria sponge, and I do enjoy a classic cake so I readily complied. I had raspberry jam in the fridge so decided, in a bold move that would have me cast out of the WI, to buy a pot of double cream and I was all set to go.


I have made various victoria sponges before but can honestly say hand on heart that this was the most delicious. I feel a bit of a fraud saying this as I did not do anything special, in fact my mind was on so many other things, that it should, in all fairness, have been a disaster.

Instead I was rewarded with a super soft, delicate sponge with a quite wondrous crumb structure. I filled it with sharp raspberry jam and softly whipped cream loaded with plenty of vanilla.

I am all for new baking techniques and flavour combinations but once in a while its good to remember why a classic is so awarded a place in the classic hall of fame.

Victoria sponge (raspberry and vanilla)

170g butter
1 tsp vanilla paste or extract
170g golden caster sugar
3 large eggs
170g self raising flour
2 level tsp baking powder

100g raspberry jam
100ml of double cream
1 tsp vanilla paste/seeds from one vanilla pod

Preheat the oven to 180C/160C FAN. Grease and line the base of a 20cm springform tin.

Beat the butter, sugar and vanilla together until very light and creamy, ~5 minutes. Beat in the eggs, one at a time, scraping down the sides of the mixing bowl after each addition. Add the flour and baking powder to the bowl and fold in with a spatula until there is no visible flour remaining.

Pour into the prepared cake tin and level with a spatula. Bake in the preheated oven for ~30 minutes.  Rotate the tin 2/3 of the way through cooking, especially if your oven has hot spots (like mine). Do not slam the oven door if you do not want your cake to sink! 

When the cake is golden and springy to the touch, remove from the oven and allow to cool for ~10 minutes in the tin. Release the cake from the tin and allow to completely coll on a wire rack. 

Using a sharp serrated knife cut the cake into two layers. At this point you can choose what to sandwich the layers with if you do not fancy jam and cream.

Add the vanilla to the cream and beat until it is softly whipped. Spread the jam onto one layer of the cake then spread with the vanilla cream. Gently place the second layer of cake on top. Gently dust with icing sugar, if you wish. 

Tuesday, 21 May 2013

Kremesh

This is a photo of me looking exceedingly happy.

Why am I so happy. Well I am eating baking. And not just any baking. When I watched the Hairy Bikers bakation series I fell in love with a dish called Kremesh that they ate at a cafe in Budapest. Kremesh is essentially a cross between a vanilla slice and mille feuille. It is made of layers of puffed pastry and a vanilla custard.

While inter-railing I just happened to be in Budapest, a fantastic place, you should all go, and I tracked down this cafe and had the Kremesh. It was worth the journey, it was fantastic.

I knew I wanted to make it but saved actually making it until the letter 'K' came up for alpha bakes, and finally this month it appeared.

My Kremesh tasted amazing but did not look good. The recipe said stir the custard till thick, mine was pretty thick, more thick than I would like on crumble. But it needed to me thicker, it literally needs cooking out until you could stand a spoon in it! Also my pastry puffed up too much, If I made my own I do not think it would do that, I would also consider baking it between two tray, as like mille feuille.

Still I have learnt and its definitely one I would make again.

Kremesh 

makes about 8

pack of puff pastry (350g ish)

500ml milk
Vanilla pod
150g caster sugar
75g egg yolk (about 5)
65g plain flour
75g egg white (2-3)
65g icing sugar

Each Kremesh has 3 layers. I prefer to precut the layers instead of baking th pastry and then cutting it. Cut you pastry rectangles, each kremesh needs 3 and they all need to be the same size.

Follow the pack instructions and cook your pastry until it is golden and puffed up. Set aside to cool.

To make the custard filling first gently heat the milk with the seeds from the vanilla pod until just boiling, remove from the heat and set aside to cool. 

Whisk the egg yolks with the caster sugar until combined. Whisk in the flour, a little at a time, until you have a smooth paste. Add the milk, a little at a time, whisking constantly. Make sure the milk has cooled enough otherwise the eggs may scramble.

Once all the milk ha been incorporated into the egg mix tip the whiole mixture back into the pan. Heat gently, stiring constantly until the custard has thickened. By thickened I have learnt that this means, really very very thick not just simply thickened. Remoe from the heat and set aside.

Whisk the egg whites with the icing sugar until stiff peaks form. Fold into the custard. the custard will still be warm, that's ok.

Assemble the Kremesh by layering pastry and custard.


What my Kremesh lacked presentation made up for in yumminess!  


Saturday, 15 December 2012

Buttermilk Scones

The reasons I made these scones is two fold. First of all I needed a way in which to sample the rhubarb and ginger jam I had made (recipe coming soon), and secondly I realised that scones begin with 'S' which is the letter for this months alpha bakes.

These scones are very quick and easy to whip up and the result is a very light delicious scone. I will definitely be making them again.

Buttermilk scones

makes 7 small scones, maybe 4 bigger ones, easily doubled

110g self raising flour
25g cold butter, cubed
20g caster sugar
80ml buttermilk
1/2 tsp vanilla (extract or paste)


Preheat the oven to 220C/200C FAN. Rub the butter into the flour until it resembles breadcrumbs and then stir in the sugar. Mix the buttermilk and vanilla together and add to the bowl. Bring the dough together, starting with a fork and moving onto your hands.

Lightly flour a work surface and pat the dough out to ~3cm thick. Stamp out rounds. Re pat the dough trimmings and stamp out the rest. 

Place the scones on a baking sheet and if you wish glaze with buttermilk, or an egg-wash  Bake in the preheated oven for 10 minutes util golden. Transfer to a wire rack to cool.

Enjoy smothered with jam and cream! 

Friday, 12 October 2012

Clotted cream shortbread

When I was younger I went on a lot of family holidays to Cornwall and of the many fab memories I have, I remember lots of cream teas and I remember coming home with loads of shortbread for family members, and maybe a couple of boxes for the home biscuit tin too!

I had loads of clotted cream left over and so decided to make clotted cream shortbread. That was the easy part. Surprisingly there are very few clotted cream shortbread recipes about. So I adapted various other ones I have, I crossed everything and waited.

Clotted Cream Shortbread

makes ~20, dependant on size

75g clotted cream
75g butter, room temp
1 tsp vanilla paste or extract
75g caster sugar
200g plain flour
25g rice flour

Grease two baking sheets and preheat the oven to 170C/150C FAN. Soften the butter well with a wooden spoon. Add the clotted cream, vanilla and caster sugar to the bowl and cream by hand util everything is combined.

Add the flours and stir until the the mix comes together as a dough, you my need to press the remaining clumps together with your hands,  Lightly flour a surface and rolling pin and roll out the dough till about 1 cm thick. 

Cut out shapes with a cutter of your choice. Try and be clever with you stamping out. The more you work the dough the less short your short bread will be. Aim for just one or two re-rolls of the trimmings. Place the shapes on the prepared baking sheets.
Bake for 15-20 minutes until the shortbread biscuits are golden.
Transfer the biscuits to a wire rack and sprinkle with caster sugar while hot. 

Crossing everything worked! These were a delicious shortbread and perfect with a cup of tea/hot chocolate. Not entirely sure how long they keep for, about 3 days in my house!
I got a bit excited when I was coating them in sugar and decided to dye my sugar pink with a little bit of pink food gel. Well I had already cut out hearts so thought why not,  but don't they look pretty?

Monday, 23 July 2012

Vanilla and chocolate marble cake

Hi, sorry for the week off, I have been away volunteering and have not had internet, let alone any time to bake.

Here is something I baked just before I went away, sadly I forgot to take many pictures as it got eaten very quickly. However I can verify that it is a very nice cake, the natural yoghurt makes it extremely moist and it is very satisfying to have with your afternoon cuppa.

Vanilla and chocolate marble cake


125g butter
200g caster sugar
tsp vanilla paste
3 large eggs
150g natural yoghurt

170g self raising flour
1/2 tsp bicarbonate of soda

40g cocoa powder
60ml boiling water

40g white chocolate
75g icing sugar
tbsp milk

Preheat the oven 180/160 FAN. Grease a bundt tin well, or alternatively grease a 2lb loaf tin and line the base. 

Cream the butter, sugar and vanilla paste together until light and fluffy. Lightly beat the eggs, add to the bowl and mix until combined. 

Add half the flour and and all the bicarbonate of soda and mix until fully combined. Add half the the yoghurt and mix again. Add the remaining four and mix until combined. Add the remaining yoghurt and give a few more stirs.

Mix the water and cocoa powder to form a paste. Remove ~1/3 of the cake mix into a clean bowl and fold through the cocoa paste until combined.

Put blobs of the two different mixes into the tin, I used an ice cream scoop. 


When all the mix is in the tin use a knife to marble the two together, be careful not to marble too much, a few swirls should do it.
Bake in the oven for 40-45 minutes, in my bundt tin it took just over 30 minutes. When done leave to cool in the tin for at least ten minutes. Remove the cake from the tin and leave to cool fully on a wire rack.

Meanwhile make up the white chocolate icing, gently melt the white chocolate and set aside to cool slightly. Mix the milk with the icing sugar and then add the cooled white chocolate and mix until smooth and well combined.

Put the icing into a disposable icing bag and snip off the end. Pipe the icing in a zig zag pattern over the cooled cake.
As well as being  a tasty cake it look impressive, I think I was a little too cautious with the marbling and when I make it again I will give it a couple more swirls.

Thursday, 12 July 2012

White bottom cupcakes with White chocolate frosting

This months alpha bakes letter is 'W' after the 'V'of last month I am hoping next month might be a little easier on my poor brain! Alpha bakes is hosted in turn by Ros and Caroline, pop over to their blogs for details.
To be fair there are plenty of things you can make involving 'W' I just seemed to be lacking inspiration. It was M who came up with this creation, in a round about away. "What are Black bottom cupcakes" he asked, so I told him. "Can you make them white by turning them upside down", he asked? Well I have not done that exactly. Like a black bottom cupcake I kept the sponge on the bottom and the cheesecake on the top. I have inverted the flavours though.

I made a vanilla (white) sponge and a chocolate cheesecake topping, to up the 'W' factor a little more I topped the whole thing off with white chocolate frosting.

So there we have it White bottom cupcakes with White chocolate frosting.

White bottom cupcakes

makes 6

For the cupcakes I followed the love bakery vanilla cupcake recipe to the letter, feel free to use your favourite vanilla cupcake recipe.

For the cheesecake

100g full fat cream cheese
30g caster sugar
1/2 of one egg yolk
40g of dark chocolate

For the frosting

30g butter
125g icing sugar
1 1/2 tbsp milk
1/2 tsp vanilla paste
50g white chocolate

Pre heat the oven to 180C/160 FAN and line a cupcake tin with cases.

Mix up your cupcake batter and fill the cases 2/3 full. 

For the cheesecake melt the chocolate gently and set aside to cool. Quickly beat together the cream cheese, sugar and egg. Be cautious with the amount of egg. Beat until it is just combined, do not over-beat otherwise it will turn to liquid. 

Add a spoonful of the cheesecake mix to the chocolate and stir trough, add another spoonful and repeat. Add al the cheesecake to the chocolate, stir to combine, do this by hand, do not beat it.

Place blobs of the cheesecake mix on top of your cupcake batter.
Bake in the oven for 18-20 minutes until lightly golden.

Leave to cool on a wire rack

Once cool they can be frosted. For the frosting gently melt the white chocolate and set it aside to cool. Beat the butter and icing sugar briefly and add the milk to help it come together. Keep beating the frosting for up to 5 minutes until it is very light and fluffy. Beat in the cooled melted chocolate until it is combined. 

Pipe or dollop the frosting into the cooled cupcakes. 
Firstly I need to apologise for the state of the frosting, I was baking bread and the kitchen was perhaps a little hot to be frosting cupcakes.
Look white bottoms
This vanilla cupcake is my current favourite and I would recommend the love bakery book to everyone. The white chocolate frosting was an experiment and it really does taste of white chocolate, I really hate frostings that do not deliver what they promise, but thankfully this one does.

The sweet frosting pairs perfectly with the very rich chocolate cheesecake. Be warned this is definitely one for chocolate lovers, if you like your chocolate less rich you could try milk chocolate in the cheesecake.