Showing posts with label cookie. Show all posts

Wednesday, 30 April 2014

Chocolate brownie cookies

This is a complete winner of a recipe from waitrose. Well I made one change, I did not let the cookies cool then drizzle in chocolate. No no no. I kept the roll of dough in the fridge and cut a few of over a few days. I tucked in to them about 10 minutes after they came out of the oven for complete warm cookie/brownie bliss. I imagine if you left them to completely cool they would lose some of that fudgey goodness. If you are more patient than me and do let them cool, let me know what they are like!


Chocolate brownie cookies

150g dark chocolate
110g butter
100g golden caster sugar
100g light brown sugar
1/2 egg
1/2 tbsp golden syrup
Tsp vanilla extract
150g plain flour
60g cocoa powder
Tsp baking powder
Pinch of salt

Gently melt half the chocolate and set aside to cool a little. Cream the butter and sugar together until light and fluffy. Beat in the egg, syrup, vanilla and melted chocolate until combined. Add the remaining ingredients including the remaining chocolate (chopped)' and bear until everything is incorporated. 

Transfer the dough to parchment paper and shape into a rough sausage 20cm long. Wrap in the paper, twisting the ends and chill for at least an hour.

When ready to eat the cookies preheat the oven to 180C/160C FAN and line a baking sheet with parchment paper. Slice cookies off the sausage about 1cm in width. 


Place on the prepared sheet and bake for ten minutes. Remove from the oven and leave on the sheet for ten minutes, they will be very very soft. After 10 minutes remove the cookies from the sheet and either transfer to a wire rack to cool or eat.


A few notes, the slices may not hold together, just squish them back together or place the pieces like a jigsaw on the baking sheet, the pieces will merge during baking. Do not attempt to remove the cookies from the sheet early, they are just too soft. Oh and I implore you to eat them while warm, fudgey and delicious. 


Tuesday, 11 March 2014

Double chocolate cookies (vegan)

Some days only chocolate will do and my word are these cookies chocolately. These may not be for you if you like super sweet milk chocolate cookies, these are dark and very intense. Of course here is no reason you cannot like both!

These are vegan but I am almost certain you could use an egg in place of the egg replacer. I would not make any other substitutions though, 1) because they taste divine the way they are, and 2) because I have no idea how the wet to dry ratio would be affected.

They are intensely chocolately with a crisp outside and chewy interior, what is not to love?

Please do not let the photos put you off, this is what happens when it is dark and miserable in Scotland. No light at all!


Double chocolate cookies (vegan) 

makes 1 dozen

180g oats
egg replacer, I used Orgran egg replacer (holand and barret) and followed the instructions on the box to replace 1 egg
50g coconut oil (solid not melted)
50g peanut butter
60g golden caster sugar
60g brown sugar (I used dark, its what was in my cupboard)
1 teaspoon good vanilla extract
1/2 teaspoon baking powder
1/2 teaspoon bicarbonate of soda
1/2 teaspoon sea salt
45g cocoa powder
75-100g dark chocolate (vegan friendly, not all are), chopped into small chunks

Preheat the oven to 175C/155C FAN and line a baking sheet with parchment. 

To begin put the oats in a food processor and pulse until a coarse flour is formed, I still like some oaty bits in my cookie. Set these aside.

In a bowl put the egg replacer (or egg), coconut oil, peanut butter, both sugars and the vanilla extract, beat until combined and creamy. Add in the baking powder, bicarbonate of soda, sea salt, cocoa powder and processed oats. Beat on slow until thoroughly incorporated. Finally stir in the chocolate chips by hand.

Shape the dough into equal balls, roughly the size of golf balls. Place on the baking sheets well apart they will spread a lot,  I baked in two batches. Flatten the cookies with your hand until only 1cm thick. 

Bake in the preheated oven for 12 minutes. Remove and allow to cool on the sheet for 5-10 minutes before transferring to a wire rack to cool completely. 

Friday, 28 February 2014

Vegan ginger spice cookies

I find I am stumbling across more and more vegan blogs as I look for lactose/dairy free recipes. I have no issue with eating eggs but I am happy to make entirely vegan recipes, its fun to try new things, and besides which I can bake for vegan friends when they visit.

These little ginger cookies are delicious, if I were to make them again I would flatten them more before baking just so that the texture was less cake like in the centre. I may also make them with treacle or half treacle, half golden syrup just for a variation in flavour.


Ginger spice cookies

makes ~ 12

1 tsp egg replacer (found easily at Holland and Barret)
50g golden syrup
50g dairy free spread
50g light brown sugar
110g spelt flour
25g plain flour
1/2 tsp bicarbonate of soda
1 tsp ground ginger
1/2 tsp cinnamon
1/2 tsp mixed spice
2 balls stem ginger, finely chopped

caster/granulated sugar for rolling

Preheat the oven to 170C/150C FAN and line a baking sheet with baking parchment. At the last minute I realised I had run out, a greased tray worked just fine too.

Mix the egg replacer with a couple of tablespoons of water. Beat the egg replacer, golden syrup, dairy free spread and sugar together until smooth and combined. Add the the rest of the ingredients, except the stem ginger, and beat until nearly combined. Finally stir in the stem ginger until evenly distributed. 

Dived the dough into 12, roll into balls then in caster or granulated sugar. 

Place onto the prepare baking sheet and flatten with your hand. 

Bake for 12 minutes till golden. Transfer the cookies to a wire rack to cool. 

Thursday, 30 January 2014

Jumble cookies

I absolutely love to bake. Since I have been diagnosed lactose intolerant I have managed to keep baking pretty well, tweaks include using almond milk, lactose free spread, soya yoghurt etc.

When searching for dairy free recipes I more often than not come across vegan baking. Vegan baking is a whole new challenge that scares me though, why? The lack of eggs, eggs are normally a glue that binds everything together, how will my baking turn out? Still some of the pictures of the vegan recipes made me want to eat my computer screen, they loked so good. Mind you looking good is all very well but what about the taste.

I decided I wanted cookies and so looking round a few blogs I ended up making these jumble cookies. A mix match of a few recipes and what was in my head.

Oh my god. These are one of the best cookies I have eaten. I can't say for certain that it is solely down to the fact that they are vegan. The flavours together are simply divine. Oats, pecans, chocolate, raisins, vanilla. I am very surprised that the texture is so good without any dairy but I am so so pleased with them.

They are so insanely good that the two of us have managed to polish off 28 in 4 days.


Jumble cookies

makes ~28

100g pecans
180g oats
75g plain flour
tsp bicarbonate of soda
pinch of sea salt
100g light brown sugar
30g coconut oil
tsp vanilla paste/extract
100ml maple syrup
2 tablespoons almond milk
35g dark chocolate
50g raisins

Preheat the oven to 160C/140C FAN and line a baking sheet with baking parchment.

Toast the pecans in a frying pan until they are releasing their fragrance. Add the pecans and half the oats to a food processor and pulse until the texture is that of coarse sand.

Tip this into a mixing bowl along with the remaining oats, plain flour, bicarbonate of soda, salt and light brown sugar.

Gently warm the coconut oil in a pan until it melts. Remove from the heat and add in the vanilla, maple syrup and almond milk. 

Mix the wet ingredients briefly into the dry ingredients. Add in the raisins and chocolate and mix until evenly distributed. 

Roll tablespoons of the mixture onto the prepared baking sheets and then flatten with you hands. 

Bake in the oven for 10-12 minutes until golden. When done remove from the oven and transfer the cookies to a wire rack to cool.


I am really rather sad that these cookies are gone and will definitely be making them again. Perhaps with different nut and fruit combinations.

Now I am all out of cookies, its time to bake again and I might just get adventurous and try some more vegan baking very soon.

Wednesday, 22 January 2014

Yellowman (cinder toffee) and chocolate cookies

The deadline for this months alpha bakes has quite suddenly snuck up on me. Before I knew it the 20th January was upon me and I needed to get moving and think of something. The letter this month is Y. I toyed with the idea of yoghurt, and also my home place of Yorkshire. I had not happily settled on anything so I asked Mark if he could think of anything or help me nail down a recipe. Without missing a beat he said 'Something with Yellowman' and that was that.

Yellowman is an Irish version of honeycomb or cinder toffee. As far as my research went I did not find that the recipe differed, there are simply different names for a similar product.

I made my own yellowman, then crushed it up into vanilla cookies, a few chocolate chunks were added. just because!

Yellowman and chocolate cookies

(Makes ~ 20)

150g caster sugar, white us best
45g golden syrup
2 tsp bicarbonate of soda

125g butter (I use lactose free alternative) 
100g golden caster sugar
1/2 tsp vanilla paste
2 eggs
250g self raising flour
50g of milk chocolate, chopped

First make the yellowman, begin by lightly oil a baking sheet. Place the caster sugar and golden syrup into a pan and heat gently until the sugar dissolves. Do not stir but swirl the pan occasionally. When a lovely golden caramel colour remove from the heat and whisk in the bicarbonate of soda, the more whisking the lighter the yellowman will be. Tip onto the greased sheet and leave to cool.

Line a baking sheet with baking parchment and preheat the oven to 160C/140C FAN . Cream the butter, sugar and vanilla together. Add the eggs one at a time and beat the mixture until thoroughly combined. Add the flour and chocolate it the bowl, weigh out 100g of your cold yellowman and crush/ break into the bowl.
 Using a spatula fold in the flour, chocolate and yellowman until the cookie dough has no streaks of flour and the chocolate and yellowman is well distributed.

Drop heaped teaspoons onto the prepared baking sheet and bake for 10-12 minutes. Once golden remove from the oven, allow to cool on the sheets for a minute or two then transfer to a wire rack to finish cooling.

The yellowman cooks down to a chewy toffee like substance in the cookies. Mark seemed very pleased with them, I do not think I will get away with making them only once for this challenge.

The leftover yellowman could be used for other baking endeavours, that is if it does not get eaten by 'helpful' kitchen assistants.

Wednesday, 11 December 2013

Salted caramel and dark chocolate macaroons

One day, perusing twitter I saw a tweet proclaiming that 'today is the last day to sign up to the Great Food Bloggers Cookie Swap'. I was hooked at the word cookies and quickly signed up before the deadline could pass me by.

The basic premise of the swap is that you register your interest, get sent three names and addresses of other bloggers and send them cookies. In return 3 different bloggers send cookies to you. You pay a small fee to enter ($4, £2.50) and this money goes to charity, the money raised is also matched by companies so lots of money is raised. So lots money for charity and lots of cookies for me, everyone is a winner.
The cookies had to be robust enough to stand up to transport and also keep well. I initially considered biscotti, one of the toughest of biscuits. You're not allowed to send a recipe already featured on your blog but are able to send a variation. I have a few biscotti recipes already, and although I could have tweaked one I had another think.

After trawling the internet I found some European biscuits that for some reason made me think of English coconut macaroons. And that was that. English macaroons fit the bill perfectly, the keep very well and are robust enough to send.

The basic English macaroon is coconut, flour and condensed milk, shaped into mounds and baked until golden.

I decided I would jazz up my macaroons and make them a little less sweet and more sophisticated. I made salted caramel macaroons and dipped the base in dark chocolate.

Salted caramel and dark chocolate coconut macaroons

makes 40-45

225g caramel (from a tin or make your own)
sea salt to taste
one tin of condensed milk (390g)
500g coconut
120g plain flour
100g dark chocolate

Preheat the oven to 160C/140C FAN and line a baking sheet or sheets with baking parchment.

First gently warm the caramel and add sea salt to taste stir till dissolved. I salted a little more than I usually would, almost too salty. I wanted it to be able to stand up to the sweetness of the condensed milk and coconut.

Mix the condensed milk with the salted caramel. Add in the flour and the coconut and mix well until everything is thoroughly combined.

Using a tablespoon put heaped mounds onto the prepared baking sheets. Leave a few centimetres between each one, you will need to bake these in a few batches!

Bake for 12-15 minutes until golden. Leave to cool on the baking sheet for a few minutes before transferring to a wire rack to cool completely. They will firm up as they cool.

Once the macaroons are completely cold melt the dark chocolate and dip the base of each macaroon. Leave the macaroons upside down for the chocolate to set then devour!

Thankfully I had a few spare macaroons, so I could sample some, for quality control you understand! I really liked the texture of these, caramelised on the outside, soft in the middle, and the caramel chocolate combination helped temper the sweetness.  I hope that my recipients enjoyed them as much as we did here.

I would like to express my thanks to Merunnisa from Come.Con.Ella. for her delicious brownie roll out cookies. Pat from Pat's Kitchen for her seriously moreish Chocolate frostbite cookies. And finally Victoria from Victoria Sponge, Pease Pudding for her lovely festive Brandy soaked cranberry, Golden pecan and Dark chocolate Christmas cookies.


Monday, 18 March 2013

Cookie ice cream sandwiches

As a child I remember the long rectangular blocks of ice cream that could be sliced. I remember my mum slicing off a wedge and sandwiching it between two thin wafers. It was absolutely delicious.

I would still eat this ice cream sandwich in a heartbeat but there is nothing wrong with a little make over every now and then. 

Creamy ice cream sandwiched between two chewy cookies does not sound bad however you approach it! I had simple, but rich, vanilla ice cream so decided to pair it with a salty peanut cookie. What combination would you choose?

I am going to enter this into this months alpha bakes, for the tricky letter 'I'.


Peanut Cookies

125g Butter
100g Golden caster sugar 
75g Light brown sugar  
1 egg
½ teaspoon vanilla paste (or 1 tsp vanilla extract)
150g Plain flour 
½ tsp baking powder
100g salted peanuts (minus the few that will inevitably jump into your mouth...)

Preheat your oven to 180C/160C fan. Grease and flour two baking sheets.

Melt the butter over a low heat. Add the sugars to a bowl and stir in the melted butter. Add the egg and vanilla and mix until combined.

Add the flour and baking powder and mix until almost combined. Add the peanuts and mix until thoroughly combined.

Drop spoonfuls onto the prepared baking sheets and bake in the oven for 10-12 minutes until golden around the edges.

Once cool sandwich together with plenty of ice cream! I think chocolate chips will work beautifully here but its still lent so no chocolate for me. I guess I will have to make them again in a few weeks. Its a hard life!

Sunday, 10 March 2013

Jammy coconut squares

I made these for Mark to take to work. In the interests of research I decided to try one. It turns out they are addictive and very scrummy. I could not leave them alone and ended up polishing off at least half over the course of 5 days. Oops. There were still plenty for Mark though, he also declared them scrummy. I can see these being made again in the not so distant future and I would not change a thing.

The only down side is that they do take a little time and effort, though they are not complicated. It is not a bake that can be made and cooked in under an hour. But as they say, good things come to those who wait!


Jammy coconut squares

for the base

175g plain flour
1/2 tsp baking powder
30g butter
50g caster sugar
2 large egg yolks

for the topping

200g raspberry jam
175g dessicated coconut
175g caster sugar
4 egg whites
50g plain flour

Preheat the oven to 160C/140C FAN and grease and line a brownie pan, or similar with baking parchment.

Mix the flour and baking powder then rub in the butter until the mixture resembles breadcrumbs. Stir in the sugar, then mix the egg yolks with 2 tablespoons of water. Add the egg mix to the dry ingredients and mix until well combined.

Press the base into the prepared tin. Do not panic, there IS enough mix, you do have to press it really thin to get it to cover the base but are rewarded with a decent base later on. Bake for 15 minutes until lightly golden then leave to cool completely in the tin.

When the base is cool you can assemble the topping. To a saucepan add the coconut, sugar, one of the egg whites and 2 tablespoons of water. Gently warm over a low heat, stirring constantly until the sugar has dissolved and the mixture is thick and paste like. Add the flour and cook, stirring constantly, for 1 minute. Tip the mixture into a large bowl and let cool slightly.

Whisk the remaining 3 egg whites until stiff peaks form. Stir ~1/3 of the egg whites into the cooled coconut mix to loosen it. Gently fold in the remaining egg whites, half at a time.

Spread the jam over the cooled base, then top with the coconut mixture, making sure to spread it out evenly.

Place in the oven (preheated, as above) and bake for 25-30 minutes until the coconut is golden and toasted.


 Cool the mixture in the tin before cutting into generous squares! 

Saturday, 9 March 2013

Pecan slices

These were one of those pleasant baking surprises  One of those ones where you know you are going to like it, its not too experimental or controversial. Then you taste it and it is just wow?

These bars, for me, are one of those bakes and it is an exceedingly good job that I was taking them into work as I literally could have sat an eaten the entire pan.

Theses slices are similar to brownies, they do not have that really dense fudginess that comes from the chocolate, they are much lighter. They do however have a flaky top and an absolutely delightfully chewyness. The flavour is a very moreish butterscotch sort of flavour and the pecans add a nice contrasting nutty crunch.

They also take no time at all to make, so have I tempted you?


Pecan slices 

110g butter
350g light brown sugar
2 tsp baking powder
1 tsp vanilla paste/extract
2 eggs
170g plain flour 
100g pecan nuts, chopped

Preheat the oven to 170C/150C FAN and grease and line a brownie pan, or similar.

Gently melt the butter then combine with the sugar in a large bowl. No need for electric mixers, a good old fashioned spoon is perfect. Add the baking powder and stir to combine, follow with the vanilla.

Lightly beat the eggs and add to the bowl, stir until they are well incorporated. Add the flour ~1/3  at a time and make sure it is fully combined before adding the further increments. Finally stir in the chopped pecans.

Tip the mix into your prepared tin and smooth the top. It may not look enough in a standard brownie pan, but trust me it will rise up as it bakes.

Bake in the preheated oven for 20-25 minutes, Keep an eye on it towards the end of cooking time. Mine took the full 25 minutes. Leave to cool completely in the tin before cutting into bars.

These went down very well at work. I would suggest making them to share unless of course you have more self control than me and can bear to keep them in an airtight tin for 5 days or so. 

Monday, 24 September 2012

Peanut butter and chocolate cookies

These are my entry for this months alpha bakes. Peanut butter is perhaps not the most original thing beginning with P but time was limited as my holiday was looming! Having said that I have a plan forming and there may be time to squeeze out a slightly more inventive offering before the deadline tomorrow.

I am not, however, going to apologise too much as I love these cookies and they are a regular guest in the biscuit tin. If you do try them I am sure they will become a favourite of yours too.

Peanut butter and chocolate cookies (adapted every so slightly from the hummingbird bakery cookbook)

makes 24 (big cookies!)

225g butter at room temperature
175g caster sugar
175g light brown sugar
2 eggs
1/2 tsp vanilla paste
240g crunchy peanut butter
340g plain flour
2 1/2 tsp bicarbonate of soda
100g dark chocolate, chopped

Preheat the oven to 170C/150C FAN and line baking sheets with baking parchment. 

Combine the butter, sugars and vanilla in a bowl and beat until light and creamy. Add the eggs one at a time and beat until incorporated. Add the peanut butter to the bowl and beat on slow until combined. Add the flour and bicarbonate of soda to the bowl and mix until a smooth dough is formed. There is a lot of cookie dough, I had to stir in the flour by hand as my handheld whisk could not cope with the volume! 

Finally add in the chocolate chips and stir until evenly dispersed.

Arrange heaped tablespoons of the dough onto the prepared sheets. Space them well apart to allow for spreading as they bake. I had to bake my cookies in lots of batches. Bake for 10-12minutes until flattened and golden brown, they will continue to flatten as they cool. 

Leave the cookies on the baking sheets for 5 minutes and then transfer to a wire rack to cool completely.

These are a soft and chewy cookie with a fantastic salty sweet peanut flavour.

Saturday, 1 September 2012

Aztec cookies

Are we all excited about the return of the great British Bake off? I know I am. I am just as excited by the new book to go with the series, Great British Bakeoff: How to turn everyday bakes into showstoppers.

I came home from work on bank holiday Monday, yes in Scotland  its not a holiday, well it is for M he works at a bank and holiday have to be the same, and waiting for me was this book, a present for me! Mind you as M says its not really a present all for me, he knew when he was buying this book that he was going to get to eat all the treats from it, so everyone wins!

I sat and red this book from cover to cover, which can take a while as it is satisfactorily huge book. I wanted to make everything immediately but sadly last week was super busy at work and so I was limited on time.

I was less sad once I had made and tasted these aztec cookies. The book does exactly what it says on the tin turning these quick to make cookies into show stopppers with the addition of gold dust (yes I already had gold dust lurking in my baking cupboard...)

Normally I am not a fan of cakey cookies, I like them crisp or chewy, not soft. However the flavour of these is so lovely that I shall make an exception. Deep chocolate and coffee make for a lovely rich biscuit, complimented by nice large chunks of white chocolate. They are just the thing after a long day.

The book features recipes from the current show plus plenty of others. And don't worry it does not reveal the winner.

Monday, 30 July 2012

Cookie dough sandwiches

First of all I must urge everyone who has ever been caught with their finger in the mixing bowl to buy 'The Cookie Dough Lover's Cookbook' by Lindsay Landis.

I knew I had to have this book the second I knew about it. I was so very excited when it arrived late last week and yesterday was my first opportunity to cook from it. I wanted everything and could not actually decide what to make and so I had to get M to select for me. He chose cookie dough sandwiches, Two chocolate chip cookies sandwiched together with chocolate chip cookie dough! Hmmmm.

I have tweaked the recipe a little, everything is measured in cups so I have converted it to grams, I reduced the sugar and tweaked the cookie dough recipe slightly too. This is mainly because I often find lots of american style baking a little too sweet for me.

For any one who is worried all the cookie doughs in the book, that are designed to be eaten raw, are eggless, so it is safe for all.

Cookie dough sandwiches


Makes between 20-24 sandwiches


For the cookies


170g butter
125g caster sugar
2 tsps vanilla paste
75g light brown sugar
2 eggs
210g plain flour
1/2 tsp bicarbonate of soda
Pinch of salt
100g chocolate chips (I used dairy milk chopped into small chunks)


For the cookie dough


115g butter
75g brown sugar
tsp vanilla paste
50g icing sugar
40g flour
Pinch of salt
60ml whole milk
40g mini chocolate chips (again I used dairy milk, these need to be very small, so halve regular chocolate chips or chop your chocolate nice and small)


To make the cookies beat the butter, sugars and vanilla paste together until smooth and creamy, you can use an electric whisk, for some reason I used a wooden spoon and good old fashioned elbow grease!


Beat in the eggs until fully incorporated. Add the flour, bicarbonate of soda and salt and mix until combined. Finally stir through the chocolate chips until evenly distributed. Cover the dough and allow to chill for at least 1 hour or even overnight. nb I left my dough for an hour, I think that it would have been better left for two.


Preheat the oven to 190C/170C FAN and line two baking sheets with baking parchment. Roll tablespoon sized pieces of the dough into balls and place on the baking sheets, at least 5cm apart. nb, you may want to leave more space between as my cookies spread a lot, mind you if I chilled them for longer they may not have spread as far.


The recipe states to flatten the balls lightly with your fingers, I did not need to, and my cookies spread nicely, though I suspect if you have chilled you dough for along time you may want to flatten them a little. Trial and error may be needed here. 

Bake the cookies for 8-11 minutes (check after 8) until golden around the edges. Leave on the baking sheets for a couple of minutes and then transfer to a wire rack until completely cool. 


To prepare the filling beat the butter, brown sugar and tsp vanilla paste until light and fluffy, this time I did use my electric whisk! Mix in the icing sugar, flour and salt until incorporated. Slowly add the milk and beat for about 2 minutes until light and fluffy. Stir through the chocolate chips. 


When the biscuits are totally cool sandwich them together with the filling. These will keep for up to 3 days in kept in a tin in the fridge.  

I love love love these cookies, they taste absolutely amazing the day they are made and just as fantastic the next day.

Tuesday, 24 July 2012

White chocolate and orange cookies

Rather unusually I had some white chocolate going spare, I normally cannot keep it my in cupboard long term without nibbling at it!

A quick root around my baking cupboard confirmed that I had all the ingredients handy to make these cookies.

 I do not think that I have made them since I was in america which is a) a crime, as they are delicious and b) why I had forgotten that a few aspects of the recipe need tweaking. 

These cookies spread, a lot, they need to be much more than the stated 5cm apart, and secondly they do not need to be flattened, they spread enough on their own. The first batch of my cookies were still delicious but a little misshapen!

These were not planed but as I have just realised that they have white chocolate in them I am going to squeeze them into this months alpha bake. Alpha bakes is a blogging challenge which is hosted on alternate months by Ros from The more than occasional baker and Caroline from Caroline makes. This is a monthly challenge where the aim is to bake with an ingredient that starts with the random alphabet letter chosen for that month. This months host is Caroline and the letter ‘W’.

White chocolate and orange cookies

makes ~30

113g butter
230g caster sugar
tsp vanilla paste
zest of an orange
1 large egg
165g plain flour
1/2 tsp bicarbonate of soda
1/4 tsp baking powder
150g white chocolate, chopped 

Preheat the oven to 190C/170C FAN and line baking sheets with baking parchment.

Cream together the butter, sugar and vanilla paste. Add the orange zest and the egg and beat until fully incorporated. Add all the remaining ingredients and stir to combine.

Roll into balls, I used a tablespoon as  guide, and space very well apart on the baking sheets. Bake for 8-10 minutes until golden.

Leave to cool on the baking sheets for 5 minutes, using a palette knife, transfer the cookies to a wire rack to finish cooling. 

Once I had ironed out the creases, my cookies looked like cookies! They should keep for 5 days in an airtight tin, but I am not sure they will last that long!

Wednesday, 11 July 2012

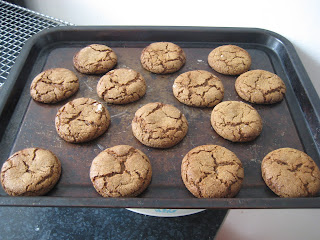
Molasses cookies

I am in love. These are such a simple cookie to make, smell amazing cooking, and look very pretty when they come out the oven, but this is not the reason I love them. From the first bite they had me hooked, I warn you eating one is actually impossible, it is much more likely that you will eat the entire tin in one sitting.

These delectable cookies were mentioned in this months cupcake book club read, the book club is run by Kelly of an american cupcake abroad, check out her blog if you want to join in!

 Looking around most recipes are pretty similar. Below is my interpretation. I had to use black treacle (very very very similar to molasses) as getting actual molasses is not an option where I live.

Molasses cookies

makes around 35

160g butter
200g dark brown sugar
1 egg
60g of black treacle
250g plain flour
1/2 tsp bicarbonate of soda
1 tsp ginger
1 tsp mixed spice
caster sugar for rolling

Heat the butter gently until melted and stir into the sugar. Add the egg and mix until incorporated, it will take a minute. 

Add in the treacle and mix again. Add the flour, bicarb and spices to the bowl and mix until everything is fully incorporated. 

Chill the dough in the fridge for ~ 1 hour. Preheat the oven to 190C/170C FAN.

Roll the dough into equal size balls, I used a level tablespoon to get my cookies the same size.

 Roll the ball lightly in caster sugar and place on an ungreased, unlined baking sheet. 

Make sure to spread the cookies well apart as they will spread.

Bake for 8-10 minutes. Remove from the baking sheet and leave to cool on a wire rack.
Have I mentioned that I could eat my own body weight in these? They do store well in an airtight tin, however my batch may not have been stored very long at all... and so I cannot definitively say how long they store for!